Showing posts with label beans. Show all posts

Thursday, February 7, 2013

Sausage & Polenta (Easy & Rustic)


Very rustic Italian dinner you can whip up in 30 mins. Don't fear polenta- it's easy! But if you are worried or super strapped for time you can pick up some quick cooking polenta. Picture isn't that great, but it was really tasty- especially the sauce.

All these items you can have in your freezer and pantry.  That's why it is a great recipe to have in your back pocket in a jam- you can even substitute any other meat (like chicken) or even just add more beans for a vegetarian version.  Sometimes I like to throw in a handful or two of frozen peas in the polenta.

Sauce:


  • 1 lb of sausage (or meat) I used hot Italian sausage
  • 1 (28oz) can of crushed tomatoes
  • water
  • 2 garlic cloves, minced
  • salt and pepper
  • basil, fresh if you have

  1. Heat a sauce pot to medium high
  2. Add the sausage to the pot (I sliced mine into smaller pieces- this is just preference).
  3. Brown on both sides quickly.
  4. Then add the garlic, heat about one minute
  5. Add the tomatoes
  6. Fill the tomato can half way up with water and add to the pot (just eyeball it)
  7. Stir to combine.  Bring to a boil, reduce to a simmer and partially cover.  Stirring occasionally.
  8. Cook for about 30mins (you don't have to cook that long- just make sure the sausage are cooked all the way through!) 
  9. Before serving season with salt, pepper and basil to taste.

Beans:

If you have canned beans- wonderful! Use two cans of cannellini beans- just open the can, drain and rinse. Top the polenta with the beans and pour hot sauce over them

If you have dry beans- you had to soak overnight, then take about 2 cups and just cover with water.  Then add a big pinch of salt and bring to a boil and simmer for 30 mins (or until polenta and sauce is done).  Taste a couple beans to see if they are done.  Then drain and rinse quick.


Polenta:

  • 4 cups of water
  • 1 cup of cornmeal
  • pinch of the following spices: onion powder, oregano, red pepper
  • 1 tsp of salt
  • 1/4 cup of parmesean cheese

  1. In a pot add the water and salt.  Bring to a boil.
  2. When the water is bowling grab a whisk and super slowly add the cornmeal a little at a time, whisking consistently.  This process is called "raining in" because you are adding like a light rain shower basically.
  3. Stir, stir, stir until it comes together- will look like grits or grainy mashed potatoes almost. When it comes together swap your whisk for a wooden spoon (wooden is traditional).  Reduce heat to low and you need to stir pretty constantly (this helps break down the starches and make it yummy).  I don't but stir every couple minutes so the bottom doesn't burn.
  4. Be careful because the polenta will turn thick and bubble and splatter a bit.  So just keep an eye out.  I cook for 30 minutes until smooth and creamy and it doesn't taste bitter anymore.  Should taste sweet and a touch grainy.
  5. Right before you serve stir in your cheese.

Assembly: Polenta, top with beans, top with sausage sauce, and finally some extra parm cheese!


Friday, December 14, 2012

Gnocchi


One word: Gnocchi.  Delicious, filling pillows of awesomeness. (oh yea- pronounced roughly knee-aw-kee)

Gnocchi are basically Italian dumplings.  Traditionally made with potatoes, but also can be made with ricotta cheese (among other things).  They look intimidating, right? Wrong- probably one of the easiest pasta's you can make.  Have you ever watched that show that only needs 5 ingredients for her recipes? Well yea- this only needs 4 ingredients- FOUR- that is it.

It might not be the quickest dinner- but the whole process took me about 1-1 1/2 hours (and I was taking my sweet time).  That is also including boiling the potatoes.  You can eat the gnocchi straight from the water after boiling, but they are SO MUCH better fried in a bit of butter/oil after to get that crusty exterior. 

Have you ever bought fresh gnocchi in the store? Well you will never again- it probably cost me around $2 to make all this pasta- which would probably be around 3-4 store bought packages. Saving money AND making something downright impressive. Score.

To pair off the gnocchi I made quick blanched then sauteed string beans with pine nuts in garlic butter/oil sauce.  It is a good texture trade off and the flavors are clean and simple.

Best part is that if you have any left over you just lay out on a sheet tray, freeze them, then into a zip lock bag and you have a quick easy dinner ready to go whenever!  *Go ahead and pat yourself on the back after making this recipe*

**IMPORTANT**
Other quick thoughts: You don't need a ricer, I used a cheese grater (which I assume most people have- just use the larger holes because the smaller ones don't work as well), and if you really don't have a box cheese grater- you can always just mash the potatoes.  The potatoes I guessed on the weight- I have pics though. The flour will vary, I started with 1/3 of a cup then worked my way up to 2/3 cup, 1 cup etc.

I also skipped the "making ridges" part- which is a thing to do because the ridges hold sauce onto the pasta- butttttt the technique wasn't working with my dough- so for the first time making gnocchi I decided to cut my losses and not do the ridges.

Gnocchi

Ingredients

  • about 2lbs of potatoes (use Russets)
  • about 1 cup of flour
  • 1 tsp of salt
  • 1 egg, beaten

Directions (also see pictures below)


  1. Peel your potatoes. Put in a pot, cover with cold water, add a tbsp of salt to the water and bring to a boil. 
  2. When the potatoes are tender, drain(time will vary on size of potatoes). You can tell when they are done when you can stick a fork in the potato and it slides off the fork clean.  (You can also bake in the oven, but I felt boiling would be faster).
  3. While they are cooling, get your station set up- get a large pot of water to boil for later and also a large sheet pan dusted in flour to lay your gnocchi after you cut them.
  4. When potatoes are cool enough to handle, grate them on the large holes of your box grater (or rice them, if you are cool enough to own one of these fascinating ricer devices).
  5. Add the grated potatoes to a large bowl.  Add your salt and egg.
  6. Then add the flour, I started by adding 1/3 cup at a time- you don't want to add too much flour, so start with a little, see the texture, then add more if it is still sticky.  Making this "dough" will seem odd and feel a little weird because it is potatoes.  But the dough will come together and finally be able to form a ball.
  7. Turn out the ball onto a floured work surface and cut into 8 pieces (ya know- like you would cut a pizza).
  8. Always make sure your surface is floured- So then take one section at a time and roll into a log, I would say roughly about a little fatter then your thumb.  Then cut into 1 inch pieces and then transfer to your floured baking sheet.  
  9. Repeat will all sections of your dough.
  10. When all your gnocchi are done, salt the boiling water and add in batches- don't over crowd the pot.  When they float to the top they are done!  When they float to the top be sure to take them out right away, if you leave them in the water too long they will disintegrate.
  11. Serve with your favorite sauce!  Lighter sauces work better with these delicate pillow pastas.
I included the fork in the pic so you can see the size of the potatoes


Set up your workstation


Gnocchi w/ String Beans and Pine Nuts in a Lemon Garlic Sauce

  • about 1lb of string beans cleaned and trimmed
  • 3 garlic cloves
  • 2 tbsp of pine nuts
  • 2 tbsp of oil
  • 2 tbsp of butter
  • 1 lemon
  • pecorino cheese

  1. In a small skillet, add the pine nuts and toast for a minute or so on med-low heat.  Remove from heat and reserve.
  2. In a large skillet, heat the oil and butter. Smash the garlic cloves (but try and keep them intact) and add to the oil.  When lightly golden, remove the garlic cloves. 
  3. Add the gnocchi in batches to the hot oil and pan fry until golden on one side then flip over and brown on the other.
  4. Take out and let drain on paper towels, continue working in batches until all are browned.  
  5. Blanch the string beans first (I just threw them in the left over pasta water for a minute) then add to the left over garlic oil and saute until tender but still crisp.  
  6. Zest the lemon over the string beans and toss to coat.
  7. Gently toss the gnocchi and string beans together.  Top with pine nuts and grated pecorino cheese.


Thursday, August 23, 2012

Spicy Sweet Citrus Summer Salad


So the summer is winding down, which I wish it could go on forever. I love the summer.  But on the other hand I do welcome fall with its crisp clean air and warm delicious meals.  Enjoy the last days of summer with this crisp bright salad.  The chicken was so good I will probably just use this marinade for grilled chicken basically all the time. 

I also have exactly one year and one week left until I am getting married.  ::exciting:: I have to start dress shopping soon- and what better thing to make yourself feel skinny and healthy then a salad :)

The combo might seem a bit strange- but I really love the different textures and flavors. I'm sure you might have seen a similar combo of flavors before.  The earthy rosemary with the creamy beans and the orange just adds such a fresh pop along with the cool crunch of the fennel and lettuce.  The onion is spicy and sweet, and olives with that salty bite- and the chicken- like to die for so yum.

 ::Side note:: I used chick peas in the picture- but I really wanted to use cannellini beans- and I usually have a can but OF COURSE when I really need them- I don't have them. So I wrote the recipe for cannellini beans (but any light colored bean or even peas could work- or you could just totally omit them)

Oh and for this I totally whipped out my trusty George Foreman Grill.

Spicy Sweet Citrus Summer Tuscan Salad (w/ Grilled Chicken)
serves about 4 to 6

Ingredients

For the Marinade
  • 1 orange, zest and juice (if the orange doesn't give a lot of juice, I used an extra splash of regular orange juice)
  • pinch of red pepper flakes
  • pinch of salt and pepper
  • pinch of fresh rosemary
  • 2 tsp of canola oil
Mix all these ingredients together and add the chicken.  Pop in the fridge for half an hour at least to let the flavors infuse.


For the Salad
  • 1 orange, segmented* (I used the small navel orange)
  • 1/2 red onion, sliced thin
  • 1/2 bulb of fennel, sliced thin
  • 1 romaine heart, chopped
  • about a 1/2 can of cannellini beans, rinsed and drained
  • about 8 black olives, sliced


For the Salad Dressing

  • 1 orange, zest and juice
  • couple fennel fronds from the fennel, chopped
  • pinch of fresh rosemary, chopped
  • pinch of salt and pepper
  • about 3-4 tbsp of extra virgin olive oil
  • small pinch of cayenne (optional)

  1. Grill your chicken. Then I thinly slice on the bias.
  2. Toss all your salad ingredients together in a large bowl.
  3. Add all the dressing ingredients into a small bowl, except the oil.  Mix the ingredients and then slowly stream in the oil while whisking.  Pour a small amount of the dressing on the salad and toss.  Just enough to lightly coat.
  4. Then add salad to bowls, top with chicken and drizzle more dressing on if you want.  You can even finish the salad off with some shaved Italian cheese. MmmMMmm.
*Segmented: this is a fancy way to cut up citrus.  First cut off the ends and then cut off the rest of the rind as shown in the pic below.  Then you carefully cut the fruit with a small pairing knife in between the white lines of the pith. (here's a helpful video)

Thursday, March 1, 2012

Grilled Chicken w Chipolte Garlic Sauce and Healthy Refried Beans


I love grilled chicken and come on who doesn't love tacos! A super secret splurge of mine used to be Taco Bell, I know, I know, but it was so good! Here is a healthy spin on tacos and one of the best parts is that you can eat three of these!  Depending on how many tortillas come in your package, figure each taco has about 4 slices of chicken in it all about an inch thick.  I had a ten tortilla package, but I also grilled extra chicken for lunch the next day.  So you kind of have to eye ball it a bit- leftovers are never bad.

Let’s start with the tortillas and chicken
· 1 package of corn tortillas (8in taco size)
· 2-3 chicken breasts- butter flied
· cooking spray

So if you have ever eaten a corn tortilla raw- it is pretty gross- rubbery and no flavor, but if you have been to a restaurant and had then- super delish. Why? Because most likely they were deep fried.  Anyway since deep frying is not an option- we will bake! I got this idea from I think it was Eating Well website where you bake the tortillas instead of frying or cooking on the stove top. 

Couple pointers here: you have to microwave these things for about 30 seconds so they do not rip when in the oven.  As you can see from the picture, I had to experience this first hand.


Don't mind my dirty oven
Start by preheating your oven to 375 degrees F.  After you microwave them for 30 seconds (careful they are probably a bit hot) spray with some cooking spray and lay on the rungs of your oven grate.  If you have a taco shell baker thing go ahead and use it.  Cook for about 7 minutes.  I would suggest doing this step last because if you let them sit, they might harden up too much to open and stuff later.  You can also drape them over two prongs depending on your particular oven. (If you're worried they will break- just slide a pan under to catch them if they do)

Chicken- super easy- just butterfly open season with a bit of salt and pepper and throw on the grill


So onto the super secret recipes for healthy indulgence...

Chipotle Garlic Sauce

· 1 cup of plain non fat yogurt
· 1 chipotle in adobe sauce, minced
· 1 garlic clove, grated (or minced fine)
· 1/2 lime, juiced (other half we use for the salsa!)
· small pinch of salt

Combine everything in a bowl and stir until mixed though! You won't believe this was yogurt- and the whole cup of yogurt is about 130 calories and no fat! Booyah.


Simple Salsa 

Salsa is one of those things you can just pile on because it is no fat and all veggies.

  • 5 plum tomatoes, chopped
  • 1 green pepper, chopped
  • 1 jalapeno, chopped (optional)
  • 1 garlic clove, grated or minced
  • 1/2 red onion, chopped (other half we use for the beans!)
  • 1/2 lime, juiced (other half we used in the sauce)
  • 1/2 tsp salt
  • 1/2 tsp cumin
Again, just combine everything in a bowl and mix until combined! Taste before serving!


Healthy Refried Beans

Classic refried beans are made with pinto beans, but I used what I had in the cabinet which happened to be black beans.

· 1 can of beans, drained and rinsed
· 1 tbsp of oil
· 1/2 medium onion, chopped
· 2 garlic cloves, minced
· 1 tablespoon of chili powder
· 1 tsp of cumin
· salt and pepper
· about 2/3 cup of low sodium chicken broth
· 1/2 cup of corn (I used frozen)

In a skillet heat the oil and then sauté the onion and garlic until soft.  Add the beans and spices, stir to combine.  Add the chicken broth and heat through, about 5 minutes.  Then mash (with a spoon or potato masher) until it becomes a paste, you might have to mash then let it cook out a little.  Then add the corn and heat through.  Season with salt and pepper to taste.  You can even top with some cilantro.

Building the taco is easy, just add the beans, then chicken, then salsa, then top it all off with the sauce!


Thursday, January 5, 2012

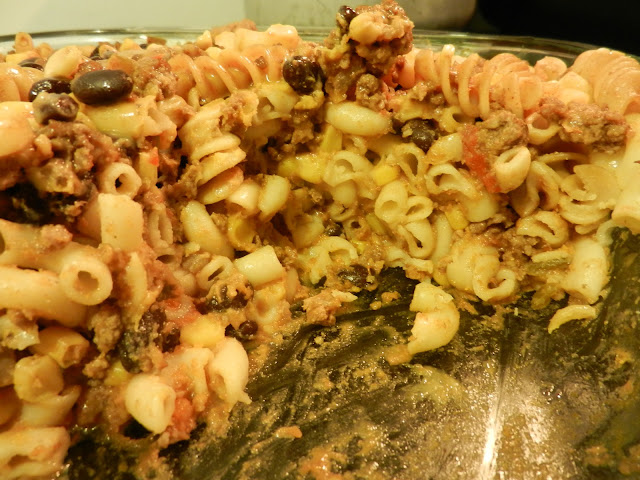
Beefy Southwestern Casserole

So this is basically a hamburger helper but way more delicious.  When I tasted this it was amazing.  Also super easy to make.  Originally I was making tacos but I got lazy and made a casserole instead.

Potential other names for this dish:
Beefy Burrito Casserole
Taco Pasta Casserole
Beefy Taco Casserole
and the list goes on...

If you wanted to add things like fresh peppers and onions that would be great in here too.

Ingredients

  • 1 pound of pasta- your choice.  I used half whole wheat rotini and half regular elbows
  • 1 1/2 lb of ground beef
  • 1 cup of salsa
  • 1 cup of cheddar cheese, plus a little more for sprinkling on top
  • 1 can of beans, drained and rinsed- I obviously used black beans
  • 1 can of corn, drained
  • 1 packet of taco seasoning (usually I make my own but we all cut corners sometimes)
Directions
  1. Preheat your oven to 350 degrees F
  2. Boil water for the pasta, cook until al dente, drain and reserve
  3. (If you are adding fresh ingredients like peppers or onion cook them in the skillet before the meat.  Cook only a couple minutes then incorporate them into the meat while browning.)
  4. In a skillet brown the meat and crumble.  I followed the directions on the taco seasoning packet- when the meat is brown, drain and then add the seasoning and about 1 cup of water.  Heat until thick.
  5. In a big bowl or right in a large 9 x 13 casserole dish mix the pasta, meat, cheese (leave some for the top!), salsa, beans and corn.
  6. Sprinkle the top with some cheese, cover and pop in the oven for 20 minutes. 
  7. If you wanted a brown cheesy top- turn on your broiler, remove the foil and let it sit under the broiler a couple minutes until brown and bubbly.
  8. Top with jalapenos, sour cream, more salsa etc- whatever you like on your tacos!

Related Posts Plugin for WordPress, Blogger...