Showing posts with label dessert. Show all posts

Monday, May 14, 2012

Brownie Cupcakes with Butter Cream Frosting


Because I don't bake. Like at all. I even manage to screw up boxed brownies. I went out on a limb for mother's day and decided to challenge myself to make cupcakes from scratch- but I wanted them to be special.  We went to see my fiance's grandmother and mother for the day and I needed a travel well dessert plus wanted to make it delicious of course. 

 
As I said, I don't bake- I think it's the importance of measuring exactly and following the recipe to a T to make it work that I can't grasp- like when I cook anything it's always eyeballing stuff or throwing in a handful of that. With that being said this is not my recipe but found this really easy to follow recipe with easy ingredients.

 
Turtle Brownie Cupcakes

I followed the cupcake recipe and searched her blog for the butter cream frosting as well. But just made it plain.

Buttercream Frosting (enough to frost 12 cupcakes nicely)
1 stick of unsalted butter, softened
1 teaspoon vanilla extract
2 cups confectioners sugar
 
Combine all ingredients in a medium bowl. Beat with an electric mixer slowly at first to incorporate all ingredients. Then, increase speed to high to get light and fluffy. Beat for 3 - 5 minutes.

These cupcakes were super rich, but oh so delicious. Like I wish I could eat two but they are so filling- talk about leaving room for dessert!

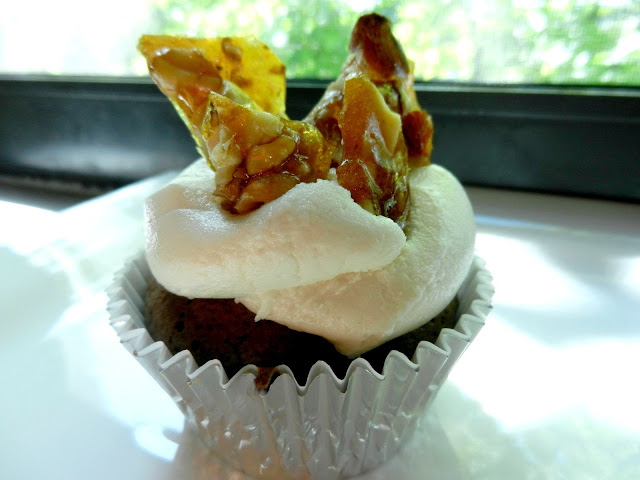
So I made the cupcakes, topped with frosting and instead of what her topping was exactly I switched it up a bit to make it a tad less messy for me. I made caramel candied nuts.

Caramel Candied Nut Topper

Ingredients

  • 1 cup of nuts of your choice, chopped
  • 1 cup of white sugar
  • splash of water, pinch of salt


Before you start the caramel have the nuts chopped and ready to go, along with a piece of parchment paper or silicon baking mat.  I chose walnuts and almonds (because I had them on hand).

In a small sauce pot add 1 cup of white sugar and about tablespoon or two of water. Bring to a boil over medium-high heat.  It will start to boil and become thick.  It will start to turn a golden color. When this happens shut off the heat, add a pinch of salt and swirl the caramel a couple times.  Mix in the nuts and stir until all covered with caramel.  Then pour out onto your paper or mat and spread to an even layer to cool.  When cooled completely break off small bits and top your cupcakes!
 

(For some more detailed caramel making pics check out my previous post Caramel Nut Popcorn)
 
 
Now I can't wait to bake more! Our friends are having a baby and just told us last night! We are super happy for them.  In July they find out the sex of the baby and want to do the surprise gender cake for the big reveal! And asked ME to make it. So excited! Congrats you guys xoxoxo 


Friday, March 23, 2012

Tropical Tartlets


Yea!!! Featured Post on one of my fav blogs Eat Yourself Skinny by Kelly!


My last finger food dessert was pretty popular so I decided to do another cute idea.  I love desserts that are portioned already, because sometimes Aunt Sally ignores you when you say "only a small slice" and gives you a serving for 3.  Anyway, these are still dessert and should be eaten conservatively.  Savour eat bite as you chew to extend the food you are consuming.  Another good idea is to not house down the dessert in like three bites, take a bite, take a break, drink some water, take a bite, take a break, maybe even leave some on your plate.  You don't have to eliminate dessert from your life even if you are dieting, just moderation.

These are a bit on the lighter side, because instead of using butter I used heart healthy monounsaturated canola oil.  I also used non fat yogurt as the filling to simulate a custard-like mouth feel.  This was inspired by one of the best desserts I've ever eaten, and it was a lemon custard or pastry filling fruit topped tart from some bakery on Jericho Tpke, it was omg delicious.  The last part of the glaze is optional, but really makes it look professional.

Besides being easy to make, these are perfect for entertaining because they can be left out at room temperature and look really pretty (like most pastry items).  I am not a baker, believe me, you can ask my sister.  I made her these chocolate "cookies" for Christmas and omg they were horrid.  But even if you don't bake, the simple pie crust formula is pretty fool proof. One key is using ice cold liquid and adding only a little at a time.

The pie/tart crust is a great beginning for any tart you are making- you can always substitute different fillings and fruit on top!

Pie Crust

Ingredients
  • 3/4 cup of whole wheat flour
  • 1/2 cup of white flour
  • 1/4 cup of canola oil
  • 1/4 cup of triple sec (or any other orange liquor)
  • 1/4 cup of coconut water
  • Ice
  • pinch of salt
Directions

  1. Preheat the oven to 350 degrees F.
  2. In a food processor or mixer add the flour and salt.  Pulse a couple times to combine.
  3. Add the oil, pulse to combine
  4. In a measuring cup put the ice, triple sec and coconut water.  (If you don't have or can't find these two ingredients, you can always just use plain water no big deal)
  5. Slowly add the liquid as you pulse.  It should start to form a dough.  When it looks crumbly, but coming together pour out on the counter and knead just until it comes together. 
  6. Form into a disk shape and wrap with plastic wrap, then refrigerate for at least 30 minutes.
  7. Roll it out pretty thin and then using a glass or cutter, cut circles and set aside.  (you might have to collect scraps, roll into a ball and then roll out again to fit more circles)
  8. This makes 24 3inch circles.
  9. After you cut them, depending if you are using mini muffin tins or regular, I rolled them out a little more so they would fill the tin fully. 
  10. Prick the bottoms with a fork so they don't puff up.
  11. Bake for 15 minutes.
  12. Take out of the tin to cool.
  13. Fill with filling of your choice!


Tropical Tartlet Filling

Ingredients
  • 6 kiwis
  • 1/2 pineapple
  • 1 lime, zest and 1 tsp of juice
  • 1 1/2 cups of non fat plain yogurt (greek yogurt would be best)
  • about 24 mint leaves
  • apricot jam or preserves
  • 1 tbsp of coconut water (or regular water)
Directions
  1. First prep all your fruit, cut into small slices/pieces.
  2. Take a strainer, bowl and paper towels- put the strainer in the bowl and line the strainer with paper towels, pour the yogurt on top of the paper towel (don't worry it will come off cleanly later) to drain. Set in the fridge for about 1 hour (at least), you need it really thick.
  3. When the cups are ready, take the yogurt out and put into a bowl, stir in lime zest and juice.  Stir to combine. (If this is too tangy for you, you can always add a sprinkle of sugar, but the sweet fruit will help balance it out)
  4. In a small pot add 1/4 cup of apricot jam and the water, heat until thick like a glaze.
  5. Fill each cup with about 1 tbsp of yogurt and top with the fruit and then brush the glaze on the fruit. 
  6. Top with a mint leaf and enjoy!


Monday, September 19, 2011

Roasted Figs Glazed with Honey & Balsamic


This idea came from something I saw on Five Ingredient Fix I think.  This is such a tasty quick snack or perfect topper for ice cream (yogurt or ricotta cheese too!)  This was the first time I have ever eaten a fig- besides in Fig Newtons, which I don't think really counts.  They are so sweet and delicious!  You eat the whole thing, skin and all.  Seriously, go out and try them- the little seeds inside are like sugary little crystals.  I used black figs, but I saw there were green figs too (which I think the purple/black ones are just more mature in age).  Here's some fun facts about how awesome figs are from wikipedia:

Figs are one of the highest plant sources of calcium and fiber. According to USDA data for the Mission variety, dried figs are richest in fiber, copper, manganese, magnesium, potassium, calcium, and vitamin K, relative to human needs. They have smaller amounts of many other nutrients. Figs have a laxative effect and contain many antioxidants.

The combo of these ingredients might sound weird and I was skeptical at first, but after you try it you realize that all the flavors work together beautifully.  Use this one to impress people with practically no effort- all you do is cut, drizzle and pop in the oven. Done.


Ingredients
(I'm not using any specific measurements because you really just eyeball everything-it's that easy)
  • Figs
  • Honey
  • Balsamic Vinegar
  • Salt

Directions
  • Preheat oven to 400 degrees F
  • Cut the figs in half and lay in an oven safe dish flesh side up

  • Drizzle figs with honey and balsamic vinegar. Don't worry about spilling over into the dish- the syrup it makes is yummy too.
  • Sprinkle lightly with salt
  • Roast in the oven about 10-15 minutes

I have seen variations of this type of recipe, and they use lemon juice, olive oil, and butter too.  To make the syrup in the dish easy to use (because mine was very little and you need to use it as soon as it comes out of the oven otherwise it will dry up and be real sticky) melt some butter and pour into the baking dish and scrape up all the syrup.  If you are using a stove top/oven safe dish just put the dish over the heat and melt some butter right into the pan.  Arrange your figs and drizzle extra sauce all over the top. Enjoy!

Tuesday, June 14, 2011

Bite Size Phyllo Cup Desserts

So last Saturday I went to my sister's house for my nephew's 5th birthday.  He's getting so big! and my sister just redid her kitchen- suuuuuuuper jealous. Hopefully one day I will have something as nice.  Anyway, I brought over a little dessert that was super quick and easy.  And I'm pretty sure everyone enjoyed them.  I knew there would be adults and kids, so I was trying to be appealing to both- that is why I chose the toppings that I did.  Essentially it's a little pudding cup, so what kid doesn't like chocolate pudding?!  Stuff it into a phyllo cup and top with a fancy topping and it is now adult friendly as well.


Bite Size Phyllo Cup Dessert

·  Phyllo Dough (didn’t even need a full package for about 30 cups)
·  Cooking spray or melted butter
·  2 ½ chocolate pudding snack pack cups (or whatever flavor you like)
·  1 ½ cups of whipped topping (you can also use the aerosol whipped cream)
·  1 tube of mini M&M’s
·  6 oz raspberries

(Phyllo dough can also be purchased in already made cups)

  1. I used about 5 sheets of phyllo at a time.  Spray them with cooking spray or wipe gently with butter.  I cut them into 12 square pieces and then placed them in my mini muffin tin.
  2. I baked about 10 mins until golden brown and firm.
  3. If you are serving these right away you should fill them now, but I filled them about 3 hours before serving and some cups got soggy- and they weren’t as good as when the cups were crunchy, so try and hold off until the last minute.
  4. Fill two ziplocks- one with pudding, one with whipped topping and cut the tip off the end and use as a piping bag.  Fill each cup-first with pudding then whipped topping.
  5. Top some with raspberries and some with M&M’s (or whatever topping you like!)

-You can substitute an endless combination of toppings and fillings.  It really is all about the technique. Like I said before you can purchase pre-made cups to make life way easier.  You can also make the pudding and whipped topping from scratch if you really wanted.  Use the idea and tailor it to your likely or event!
-I also used fat free pudding and whipped topping! No one noticed =) So eat more than one and enjoy!

-Little background on phyllo dough:

  • If you have ever eaten Bakalava- that's phyllo dough.
  • They are paper thin sheets of unleavened dough that are used a lot in the Middle East/Greece for pastries.
  • The word phyllo comes from the Greek word "leaf"
  • Can be used for desserts or savory dishes (like tarts)


Related Posts Plugin for WordPress, Blogger...