Showing posts with label roasted. Show all posts

Wednesday, October 3, 2012

Butternut Squash Risotto


Funny thing is that I already have posted this recipe, but wanted to repost with better pictures etc (which I'm still not happy with the outcome of them), and when I went back to look at the original post I noticed I posted it a couple days from today- so I guess I must have a craving for fall recipes right around the beginning of October.

Worked out perfect because it is all rainy up here in NY this week- and the rain doesn't seem like it's letting up any time soon. So this is a perfect opportunity (rain or shine) to make this SUPER DELICIOUS recipe. Seriously it is hard for me to contain myself while eating this. 

I wanted to make it with short grain brown rice, buttttttt time constraints made me use long grain white rice.  Oh well.

This recipe will be incorporating my Classic Risotto recipe and making it into a fall favorite of mine, so if you want to read up more about risotto- go check it out.

Ingredients
  • A medium sized butternut squash, peeled and diced into bite size pieces (after diced it will look like about 3 cups of diced small pieces-after roasting it will shrink to about 2-2 1/2 cups worth)
  • Plus all the regular ingredients for classic risotto:
    • 1 1/4 cup of rice (shorter the grain the better-but I used long grain white rice this time) 
    • about 5-6 cups of chicken stock (you might not use it all- it varies each time)
    • 1 onion, diced
    • ½ cup of dry white wine
    • ½ cup of Parmesan cheese
    • Oil or butter (2 tbsp)
    • salt and pepper

Directions

  1. For the squash: preheat your oven to 425 degrees F.  Dice up the squash into bite sized pieces and scoop out the seeds.  Reserve for later.  Toss the squash with salt, pepper and oil and roast on a baking sheet for 20-25 minutes until soft (will vary on how small you cut the squash pieces.  I just let it roast until I'm ready to stir into the risotto at the very end). 
  2. In a sauce pan, add the stock (or I use water and bouillon cubes sometimes) and heat until a simmer, then reduce to not even a simmer.  The point is, we are just keeping the stock warm.
  3. In a large shallow pot or I use a large high sided skillet, heat 1 tbsp oil or butter on medium then add the onion.  Saute until soft, about 5-7 minutes.  Season with salt and pepper.
  4. Add the other tbsp of oil and then add the rice.  Toast the rice for about 5 minutes, make sure it doesn't not burn.  Lower the heat if necessary.
  5. Add the white wine and deglaze (scraping all the bits off the bottom of the pan).  When the wine is almost all absorbed add a ladleful of the warmed chicken stock.  Stir until the liquid is absorbed.  (Technically I think you have to stir the whole time, but I don't.  You just want to stir enough throughout the whole process to break up the starches in the rice to make the end texture creamy).
  6. Repeat the ladleful of chicken stock and stir until the liquid is absorbed.  Repeat this until all the chicken stock is gone or the rice is done.  I taste the rice towards the end to see if it's cooked through.  When it was all done, I had about 1/2 cup of chicken stock left that I didn't wind up using.
  7. When the rice is done add the cheese and mix until well incorporated.
  8. Gently stir in your roasted butternut squash.
  9. Serve and top with more cheese and sprinkle on some roasted seeds!*
*Seeds: After your scoop them out add them to a bowl of water.  Using your fingers try and clean the seeds from any flesh.  Let sit so all the seeds float to the top.  Gently scoop all the seeds from the top of the water and let dry briefly on a paper towel (its ok if they are still a bit wet- helps spices stick).  Put them on a baking sheet and season with salt and pepper.  Put in the oven to roast with the squash for about 7-10 minutes. It will depend on the size of the seeds- if you hear them start popping- they are done.

Butternut Squash

After roasting

Wednesday, May 23, 2012

Grilled Chicken w/ Creamy Roasted Red Pepper Garlic Sauce


Super excited for this weekend! The future hubby and I are driving down to West Virginia to the Summit Point Motorsports Park for our first track day together of the year!  Going for the whole weekend means a lot of food prep and BBQ'n!  This week has been a clean out the fridge week because we will be gone close to five days or so.  First one was the Shredded BBQ Chicken Sandwiches, then I made a rice, chicken and veggie casserole topped with cheddar cheese, and now this (plus the pearl barley summer salad)!

Will try and have a good portion of the weekend documented- for easy portable grill recipes and just so you guys can see what we do on our free time lol.

Not only is this recipe super easy AND healthy but it's basically a no cooking involved one. Perfect for those hot summer days/nights.

For the chicken I just season boneless skinless chicken breasts with some salt and pepper and throw on the grill, here's the sauce you top it off with (which is a no cook)

Ingredients

  • 3/4 cup of non fat plain yogurt
  • 1 roasted red pepper
  • 1 garlic clove, grated or pasted
  • pinch of fresh thyme
  • pinch of lime or lemon zest (if making the pearl barley salad too you use the juice of this there)
  • 1 tsp of salt
  • 1 tsp of red pepper flake
  • freshly cracked pepper
Directions

  1. Put everything into a blender or food processor and blend until smooth.
  2. If too thick add a splash of milk, water, or citrus juice.
  3. If too thin add more yogurt.
  4. Serve over grilled chicken and alongside the Pearl Barley Summer Salad.

Thursday, April 12, 2012

Stuffed Mini Meatloafs w/ Veggies and Goat Cheese


These were so good and perfect little portion size.  Serve it up with this easy brown rice because they basically cook for the same amount of time.

Ingredients

  • 1 1/2 pounds of lean ground turkey
  • 2 tbs of balsamic vinegar
  • 1 tbs of Worcestershire sauce
  • 2 tsp of salt
  • 1 tsp of red pepper flakes
  • 2 small grated carrots
  • 1/2 onion, 1/4 grated and 1/4 sliced or chopped
  • 2 garlic cloves, minced
  • 2 handfuls of parsley, one for the meat, one for the rice
  • 1 small zucchini, cut into bite sized pieces
  • 1 roasted red pepper
  • 4 handfuls of arugula
  • about 2 oz of goat cheese
Directions

  1. Preheat the oven to 400 degrees F
  2. In a bowl combine the first 9 ingredients (use the grated 1/4 of the onion).   
  3. In a small skillet cook the zucchini and sliced 1/4 onion until soft. Set aside and let cool.
  4. Roast your own red pepper on the stove top or used jarred. Slice into thin strips. 
  5. From start to beginning
  6. The meat should make about 4 baseball sized portions.  On a cutting board shape the meat flat and top with the cheese (reserving about a tab or small spoonful if making the rice as well), arugula, zucchini, onions and roasted red pepper.
  7. Roll up the meat and then seal the edges.  Don't be afraid to get a handle on it and smoosh it around, just reshape into a small oval.
  8. Place on a baking sheet coated with non stick spray and then spray the meat loaves as well.  
  9. Cook for 45 mins to an hour or until cooked through and browned.

Brown Rice

Cook off the brown rice as directed, when done add the other handful of parsley and last tab of goat cheese. Stir until combined.

Tuesday, October 18, 2011

Winter Squash- Butternut Squash

Butternut squash has the same benefits as the Spaghetti Squash.  It is sweet and versatile.  I prefer to roast it and then use it for whatever I might be making.  You can eat just as is as a side dish, or add it into other things (like this risotto); you can also puree it and stir into things for a lovely color and texture or probably an all around favorite making it into a soup. 

 
This recipe will be incorporating my Classic Risotto recipe and making it into a fall favorite of mine.  Sweet, salty, cheesy, filling- so good, seriously. And don’t forget to save the seeds and roast them like we did with the spaghetti squash!

 
For my Butternut Squash Risotto we just change a small amount of things to make this dish all it's own.  I actually have to credit Giada De Laurentiis for the idea of this.  The addition of the vanilla is definitely odd, and you can always leave it out, but the taste makes it so warm and comforting- it pairs perfect with the squash.  Don't knock it until you try it- I was skeptical at first too.

 
Ingredients

  •  2-3 pound butternut squash, peeled and diced into bite size pieces
  • 1 tsp of vanilla extract (or 1 vanilla bean seeds scraped plus the hull)
  • Plus all the regular ingredients for classic risotto:
    • 1 cup of rice (shorter the grain the better)
    • about 5-6 cups of chicken stock (you might not use it all- it varies each time)
    • 1 onion, diced
    • ½ cup of dry white wine
    • ½ cup of parmesan cheese
    • Butter
Directions

Honestly an easy way to prepare this is go to my risotto link because everything is exactly the same except for two things:

  1. In the pot with the stock add the vanilla
  2. For the squash: preheat your oven to 400 degrees F.  Toss the squash with salt, pepper and oil and roast for 15-20 minutes until soft (will vary on how small you cut the squash pieces).  When that's done- add to the risotto at the very end and mix until everything is fully incorporated.
  3. Add don't forget to reserve about 1-2 cups of squash for the next recipe of leftover butternut squash soup


Super Easy Leftover Butternut Squash Soup/Puree

Ingredients
(Serves about 2-4 people depending on how thick/thin you make it)

  • 1-2 cups of leftover butternut squash from risotto recipe
  • One small onion, diced
  • 2 ribs of celery, diced
  • 2 small sized carrots, diced
  • 2 garlic cloves, minced
  • 1-2  cups of chicken stock
  • 1 tsp thyme
  • salt and lots of fresh cracked pepper

Directions
  1. In a skillet sweat the onion, celery, carrot and garlic.  Season with salt and pepper.  Remember: Sweating is cooking over medium heat and not browning the veggies.  Cook for about 5-7 minutes or until soft.
  2. Then add the leftover squash and spices.  I mashed the squash a bit in the pan to make it easier for blending later.
  3. Now when everything is heated through- you can do this in either a food processor, blender or you can use your immersion stick blender .  I used a regular blender- so I put about half the veggie/squash mixture in the blender with about ½ - 1 cup of stock- and gave it a buzz until blended.  Then I emptied the blender and did the second batch.
  4. Now the consistency is completely up to you- I like thick soups (almost a puree really) and used less stock- if you want it thinner- just use more stock.  
  5. When all batches are done I put the soup/puree back into the skillet and heated it up- just to make sure it was hot throughout. (because I used leftover cold stock)
  6. When its hot- dish out into bowls and top with whatever you like.  Some suggestions: roasted squash seeds, sour cream, crème fraiche, bacon, extra virgin olive oil etc.

If you leave it thick, like a puree, then you could also serve underneath some baked chicken as a side dish application.

Also to make this soup vegetarian- just use veggie stock instead of chicken!


Monday, October 10, 2011

Winter Squash- Spaghetti Squash

Winter squash are awesome.  They are healthy, cheap, can feed an army and are easy to prepare.  There are definitely a couple varieties but this particular installment will focus on Spaghetti Squash.

I simply made this as a side dish but the best part about this squash is that if you are watching your carb intake- just scoop out the flesh and top with your favorite tomato sauce.  Yea, it's that easy- it has a subtle nutty flavor and is way healthier for you then pasta.

  • All you will need is a spaghetti squash- I think mine was about 5 lbs (bought it at 79cents a pound), salt, pepper and some oil.
  1. Preheat your oven to 400 degrees F.
  2. Cut the squash open longways and scoop out the seeds. Save the seeds! (Ill show you what to do with them later)
  3. Sprinkle the inside flesh with salt, pepper, and oil- rub all over the inside so it is all coated.
  4. Flip the squash so it is cut side down on a baking sheet.
  5. Roast in the oven about 20-30 minutes, size will effect cooking time.  You know it is done when you poke it and it is soft to the touch.
  6. Don't worry if it get a little brown.
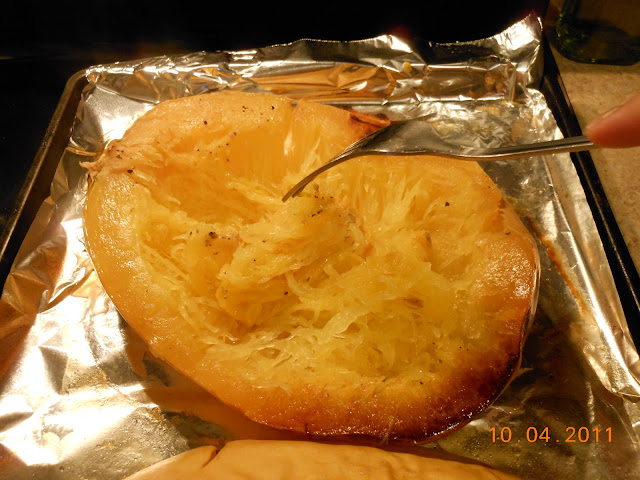
  7. When done, flip over carefully, it will be very hot and steam will escape from the underside.  If you cooked it enough the flesh should peel right away from the skin.

No mystery why they call it spaghetti squash!


And that's it! Top with salt and pepper or your favorite sauce. 

Now, what about those seeds- I think the seeds are my favorite part! If you have ever roasted pumpkin seeds- this is exactly the same thing.  Seeds are a little smaller, but taste exactly the same.

So after you scoop the seeds out, clean them up a bit and try to separate the seeds from the stringy flesh stuff.  You can rinse them off if you like. 

When cleaned, lay out evenly on a baking sheet and sprinkle with salt.  Pop in the oven alongside your squash (at 400 degrees) and roast for a couple minutes until brown.  It will take about 10 minutes.  Then just eat!  You can do this with any type of squash.

Tuesday, August 16, 2011

Roasted Pork Loin & Potatoes


This is definitely a "Sunday Dinner".  A classic meat and potato dinner that looks fancy.  Easy, but not super quick, yet still possible on a weeknight if you have the time. Overall it will probably take about an hour and a half with prep, cook and rest time.  Well worth it though.  When meat cooks a long time the heat breaks down and melts the fat so it isn't chewy.  Even my boyfriend Brendan who skeeves fatty pieces told me the crispy skin was delicious. 

I bought a full sized pork loin for $1.99/lb and it came in a cryovac of about 10 pounds.  I always cut this piece of meat into three different parts.  The fat end becomes the roast, the middle I cut into pork chops and the skinnier end piece becomes "pork tenderloins" (not because they are, just because I cut it into smaller pieces that resemble the tenderloin shape).  I bag them separate and freeze them. 

I will leave a good layer of fat on the roast piece and trim the rest of the loin accordingly.  Like I mentioned before, the long cook time and heat will melt the fat and help keep the meat juicy and flavorful over this long high cook time.  In the following pictures you can see a pretty presentation on the fat side because I "score" the fat.  Just make a deep cut in the fat layer in any design you like, I go for traditional crosshatch.

Ingredients
  • About a 3lb pork loin roast
  • 1 softball size onion, sliced
  • 2 peppers of your choice, sliced
  • 1 jalapeno, minced
  • 3 cloves of garlic, diced
  • 1 tablespoon each of: salt, fresh pepper, thyme, rosemary & adobe seasoning
  • Oil of your choice
  1. Preheat the oven to 450 degrees.
  2. Slice and prep all your veggies. 
  3. Take the pork loin and dry off with paper towels.  Slice the layer of fat with the design of your choice.  Rub the meat with all the spices.
  4. I used a cast iron skillet, but use any skillet that will be able to go from the stove top to the oven.  Heat the oil in the pan on high heat (you don't have to use too much oil if you have a good layer of fat on the pork, just enough to coat the bottom of the skillet).  It will be hot enough when you see the oil rippling.
  5. Sear the fat side first.  Sear each additional side until it's brown, about 2-3 minutes on each side.  You aren't trying to cook the meat, just brown it.
  6. When all sides are brown (don't forget the ends, use tongs to help hold it up if needed), take the meat out of the pan, and drain off any excess oil, but leave about a 2 tablespoons in the pan.
  7. Reduce the heat a bit (to about medium) and add all your veggies and garlic. Season with salt and pepper as well.
  8. Cook for about 4 mins, just until soft.
  9. Place the pork on top of the bed of veggies and pop into the oven.

Potatoes
  • about 2lbs of potatoes, diced into similar sizes (Any kind of potato will do)
  • 1 tablespoon of: salt, pepper, rosemary and adobo
  • oil of your choice to coat
  1. Combine all ingredients on a sheet pan and put in the oven with the pork.
Oven times will vary depending on the size and shape of the pork loin and the size of the potatoes.  When the potatoes are golden and brown they are done.  About 30-40 mins.  I had to remove the potatoes before the pork was done, but when the pork was resting I put them back in the oven for about 5 minutes to reheat.

I always have to use a meat thermometer to know when my meat is done.  Call it unprofessional, but I never overcook/undercook anything because of it.  I took out the meat when it reached about 155 degrees (about 30-45 mins) and let it rest for about 5 minutes.  Cover with tinfoil when resting (you do this before slicing so the juices have time to redistribute and not make a huge mess on your cutting board).


Slice and serve topped with the onions and peppers along side the potatoes.


Thursday, July 21, 2011

Roasted Chicken w Garlic, Onions, Tomato & Bleu Cheese

This was a "left-over" dish.  I needed to use up a bunch of things and this is what I came up with.  Serve it all on top of your homemade focaccia bread and omg yes delicious.  Salty, juicy, and that roasted flavor of the garlic- o man! My mouth is watering right now.  When you roast garlic whole- it is something completely different than raw garlic or even cooked.  It gets this subtle nutty and sweet flavor.  Roast a whole head of garlic and use what you need now and save the rest for later.  It can be used in sauces, salad dressings, or even just smeared on things almost like butter. Another thing that makes this dish awesome is that it is super easy- everything just gets popped into the oven- all you need to do is cut the veggies!


Ingredients
  • 4 boneless skinless chicken breasts
  • 2 onions sliced
  • 1 pepper, sliced (I used mini peppers and I just halved them)
  • 1 whole head of garlic (take 2 cloves and mince them)
  • 3 tomatoes sliced
  • few ounces of blue cheese
  • I used McCormick's Montreal Steak Seasoning (but if you don’t have, just use salt, pepper & a little crushed red pepper flake)
  • 1 tsp dried oregano
  • salt and pepper
  • EVOO
  1. Preheat the oven to 450 degrees
  2. Place the chicken in a baking dish or sheet pan- drizzle with oil and the Montreal seasoning and oregano.
  3. On a baking sheet put the onions, pepper, and two minced garlic cloves and drizzle with oil and salt and pepper
  4. Take the remaining head of garlic, slice the top off (not the root end) and wrap in a small piece of tinfoil. Before you seal it up drizzle with just a little bit of oil.
  5. Put the chicken, veggies and garlic pouch in the oven.
  6. Cook for about 15 minutes, then flip the chicken and toss the veggies around.
  7. Cook for about another 10 minutes or until the chicken is cooked through to 165 degrees. I like to put the chicken under the broiler for a minute or two to get it browned on the outside
  8. Slice the chicken.  Take your leftover focaccia bread and top with the onions and peppers. Top it all off with the fresh tomatoes and blue cheese.  Drizzle with a bit of oil and dig in! Oh and don’t forget to serve a bunch of roasted garlic along side!


Related Posts Plugin for WordPress, Blogger...