Showing posts with label sauce. Show all posts

Wednesday, August 8, 2012

Zucchini Spaghetti w/ a Quick & Fresh Tomato Sauce


Super easy weeknight dinner that even the kids are going to have fun eating!  And no one will even know its healthy! ::haha:: Serve with my Homemade Sausage.

Cut down on carbs with this dish while getting your dose of veggies.  {I used whole wheat pasta for even bigger protein boost}  If you can find this in your grocery store pick it up! I found this in my pre-packaged produce section.  How cute is this package of zucchini!?


Sauce is super simple and takes minutes to come together- all you're waiting for is the pasta water to boil!


Ingredients

  • 1/2 lb of whole wheat spaghetti (yes! only 1/2 the box in necessary!)
  • about 1 lb of shredded-into-strings zucchini
  • 1 small onion, diced small
  • 2-3 cloves of garlic, minced
  • 2-3 plum tomatoes, diced
  • 1/2 cup of water
  • 2 tbsp of olive oil
  • 1 tsp of salt (or more to taste)
  • 1 tbsp of dried basil
  • pinch of red pepper flakes

Directions

  1. Get the water on to boil for the pasta.
  2. In a large sauce pot or skillet (bc when the pasta is done we will toss in with the sauce- need some room to toss)  over medium heat add the oil.
  3. When the oil is hot add the onion and saute until soft (about 5-7 minutes).  Then add the garlic, saute for a minute or so.
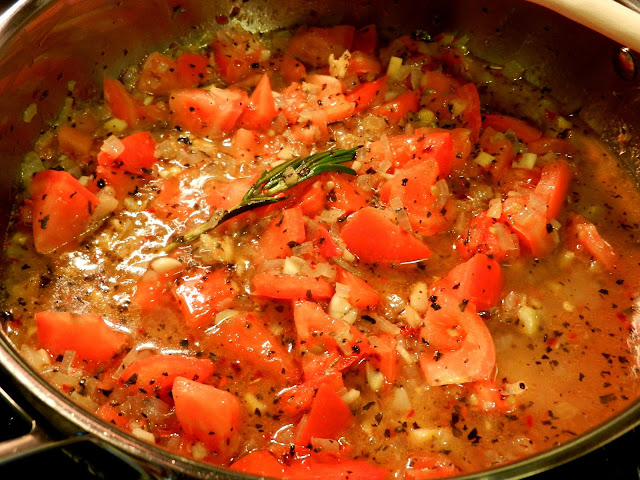
  4. Then add your tomatoes- cook for a minute or so- I like to squish them a bit in the pan so they release some juices. 
  5. Then add your spices.  Cook for a minute.
  6. Then add the water.  Bring to a simmer and keep on a low simmer until ready to serve.
  7. (In the picture I used a small branch of rosemary too, bc I had rosemary in the sausage- but this is totally optional)
  8. When the pasta is al dente add it to the sauce pot along with your zucchini and toss until warmed through and zucchini is soft (zucchini is cut so thin it cooked in a minute or so)
  9. Serve topped with some parsley and grated romano!

Monday, June 18, 2012

Homemade BBQ Sauce


Because homemade is just better. This is easy and way better than any BBQ sauce I ever bought in a bottle.  (Just take a look at the ingredients of that bottled sauce next time. ugh-half I couldn;t even pronounce)  There are so many different ways to create a BBQ sauce from scratch- experiment with different flavors and spices!

Note: this is a bit on the spicy side. To tone down the heat start with just a very small pinch of cayenne (or go with a mild hot sauce and use just a dash) and then progress with more to taste.

Ingredients
(makes about 1 cup of sauce)
  • 1 (8oz) can of tomato sauce
  • 2 tbsp of ketchup
  • 1 tbsp of Dijon mustard (you can use whatever mustard you have in the fridge)
  • 3 tsp of brown sugar
  • 3 tbsp of apple cider vinegar
  • big pinch of cayenne (Or you can use hot sauce)
  • 1/2 tsp of garlic powder
  • 1/2 tsp of onion powder
  • 1/2 tsp of ground cumin
Directions
  1. In a small sauce pot combine all ingredients and stir to combine.  Heat over medium low heat until it comes to a simmer.
  2. Simmer for at least 15 minutes to let the flavors combine and sauce thicken.  You can keep over low heat and just a slight simmer for really as long as you like.  Longer simmering means a thicker consistency.  If the sauce gets too thick for you- just add a bit of water to loosen it up.
  3. Any leftovers just put into some tupperware and store in the fridge.  You can even put in a squeeze bottle and store like that!

Thursday, May 10, 2012

Pasta with Creamy Broccoli Sauce


When you are craving a creamy Alfredo sauce this is a good swap.  It is creamy but way lower in fat.  Also the edition of broccoli is optional, but gives that extra nutritional boost and color pop!  Instead of incorporating the broccoli into the sauce you can always just serve steamed on the side (you could even pour a little extra sauce on it)

I used a long noodle pasta, but any pasta will do- try linguine!

Ingredients

  • 1 pound of pasta of your choice
  • 3 tbsp of a butter substitute (e.g. I cant believe it's not butter)
  • 1 shallot, minced
  • 3 garlic cloves, minced
  • 1 tsp of fresh thyme
  • 3 tbsp of flour
  • 1/2 cup of white wine
  • 1 cup of chicken stock
  • 1 cup of low fat milk (I used 1%)
  • 1/2 tbs of corn starch
  • 2 tbs of non fat yogurt (or you could use low fat cream cheese)
  • 1/2 cup of pecorino cheese (or parm)
  • For the broccoli: 1 1/2 cups of broccoli florets & 1 cup of pasta water and a food processor/blender)
Directions

  1. Get your water boiling for you pasta.
  2. Meanwhile in a sauce pot add the butter and heat over medium heat.
  3. When the butter melts add your minced shallot and garlic cloves
  4. Season with a pinch of salt and pepper. Then add the thyme.
  5. Cook for about 5 minutes until softened. Careful not to burn the mixture, lower the heat if cooking too much.
  6. Deglaze the pan with your wine. Cook until the wine almost completely evaporates.
  7. Sprinkle in your flour.  Mix and cook for about one minute to get rid of the flour taste.
  8. Now whisk in your chicken stock- stir until everything is a smooth mixture.
  9. Measure out your milk in a measuring cup and add the corn starch BEFORE adding to the pot.  Stir until the milk and corn starch are completely mixed. Add the milk mixture. DO NOT LET THIS COME TO A BOIL. If you are using low fat milk do not let this come to a boil- it will cause the milk to separate and your sauce will taste gritty.
  10. Add your yogurt and cheese.
  11. Whisk everything until a combined mixture.  (This would be the opportune time to cook off your pasta)  Cook the sauce for 5-10 minutes until thick enough to coat the back of a spoon. Turn off the heat and let sit for a couple minutes to thicken up even more.
  12. For the broccoli part: in a food processor add the broccoli and carefully add one cup of that salted pasta cooking water.  The pasta water will be hot enough to just cook the broccoli but still let it maintain its bright green color.  It also adds some seasoning to it as well.  Blend until it is a thick paste.
  13. In a large pot or bowl, add your drained pasta, about 3/4 of the sauce and broccoli paste.  Stir until all combined.  I leave a bit of sauce to the side to add to the top later or use for something else I cooked with the pasta- like my Mayo Crusted Chicken.
  14. Plate and garnish with a bit more sauce and shredded cheese!

Wednesday, November 9, 2011

Pinwheels and Calzones


So this past weekend I got engaged!  Super excited and hopefully I will be able to keep up with all the planning, work and my blog!  I think I'll manage- I mean, we still have to eat! 

(I also want to apologize for the sub-par photos- my camera is MIA right now!  The pics might not be as great- but it sure did taste awesome- I didn't even get a chance to take a photo of the finished cooked pinwheels- we ate them too fast!)

Anyway- so Sunday is Football day in our house and it usually means pizza too.  I changed it up a bit and made some pinwheels and calzones.  Start off with my pizza dough recipe and that will make about one dozen pinwheels and 4 calzones.  These are super versatile and you can use absolutely anything you want inside them both.  I used what I had in the fridge/freezer and dipped in my home made sauce

Pinwheels

Ingredients

  • 1/4 lb. Pepperoni, sliced or chopped
  • 1 green pepper, sliced
  • 1 small tomato, sliced
  • about 1½ cups of mozzarella cheese
  • 1/4 c. of your favorite tomato sauce
Directions

  1. Preheat the oven to about 450 degrees F
  2. Make the dough and then divide into two pieces if you will be making both recipes (one for the pinwheels, one for the calzones), if not make double wheels or save the rest in the fridge
  3. Roll the dough out into a large rectangle shape.  Make sure you use a lot of flour on the underside of the dough so it is easy to roll up.  Don't roll the dough too thin, we don't want it to rip, but if it does don't worry just patch it up- these are very rustic.
  4. It is almost like we are making a Sicilian pizza.  Spread the sauce out very lightly and evenly.  Then top with all your toppings and gently roll up into a log.
  5. Slice even sections about 1½ inches thick. 
  6. Gently transfer to a baking sheet and squish the wheels together a bit so they keep their shape. 
  7. Cook about 10 minutes or until golden brown.


Calzones
  • Use the remaining half of the dough you made
  • 1½ c of mozzarella
  • 1 cup of ricotta cheese
  • 1 small onion diced
  • 1½ c of broccoli (I used my own frozen and just defrosted and chopped up)
  • 2 garlic cloves, minced
  • Pepperoni
Directions

  1. I put the oven to 500 degrees F and then when they just started to get brown I lowered the heat to 350 degrees and let it go for another five minutes or so just so everything is cooked through- because these were thicker and I didn't want them to burn.
  2. Separate your ingredients evenly into 4 piles (for each of the calzones to make it easier)
  3. Roll the dough out into a large rectangle- like the pinwheels
  4. Cut the dough into 4 rectangles.
  5. Layer all our ingredients onto one side of the rectangle then just fold over the other side on top of everything- like a blanket.  Press the edges together to seal the calzone- you can even use a fork to make it look prettier. 
  6. Gently slice a couple slits on the top of the calzone to let the steam out- otherwise it will explode.
  7. I sprayed them with a little cooking spray and laid on a baking sheet, then popped in the oven  (See step one for oven directions)


Monday, August 29, 2011

Braised Pork w Gemolata


Ah, now this is a meal Nonna would be proud of.  So simple, yet so delicious and heartfelt.  The only hard part about this dish is waiting for it to be done.  It will take about 2 to 3 hours of cooking time.  The best part about this dish (besides the taste of course) is that you can use this method on any type of meat.  I adapted this version from Chef Anne Burrell’s Braised Lamb Shanks.  Instead of lamb shanks I used the skinny end of the huge pork loin I buy and section myself (the two “pork tenderloin” pieces as I described them in an early post).  Originally I was going to serve this dish with polenta (I think Anne paired the lamb with polenta too) but when it was cooking the smell of the house just screamed “Italian Sunday” so I paired it with some medium shells.  I plan on using this recipe next time I have guests over.


Ingredients

·         About 2 pounds of pork loin

·         1 big onion

·         3 carrots

·         3 celery ribs

·         4 garlic cloves

·         2 (6oz) cans of tomato paste

·         2 cups of chicken stock

·         2 tsp each of dry rosemary, thyme, red pepper flakes and salt

·         3 to 4 cups of water

·         3-4 bay leaves

·         Gremolata (optional and recipe follows)

Directions

1.       Preheat the oven to 400 degrees F

2.       Using a pan that will be able to go into the oven later (I used a high sided skillet, but a dutch oven will work great too), coat the bottom of the pan with oil and put over high heat.

3.       Season the meat with salt and pepper generously and brown on all sides.  Be careful the oil is very hot and might spit at you.

4.       As that browns, cut all your veggies into big chunks and process in a food processor or blender until it is like a veggie paste. 

5.       When the meat is done browning, remove from the pan and set aside for now.  Add the veggie paste and season with salt and pepper.


6.       You are going to cook the veggies until it forms a brown crust on the bottom of the pan.  This will take about 20 mins.  When it’s ready it should look like this:


7.       Add the tomato paste and cook for 5 minutes.

8.       Then add the stock (or you can use red or white wine too here) and spices

9.       Cook this until reduced by about half.

10.   Add the meat back into the pan.  Add the bay leaves as well.  Add the water until the meat is fully submerged (or almost fully submerged, mine stuck out a little). Cover the pan with foil.

11.   Cooking time will vary depending on your meat choice, but this is what I did:

a.       First 45 mins, then flip

b.      Second 45 mins, flip again and take off foil

c.       30 more minutes and then done

Boil pasta of your choice and serve topped with pork and gremolata.

 Some good tips from Anne Burrell’s recipe,were that if the water reduces too much, just add more.  Also, if you have a fatty meat you might have to skim the fat as you go.  I chose a lean meat so there was no fat to skim.

 Gremolata

So what is gremolata anyway?  It is a traditional topper (condiment) for long cooked meals to help brighten up the dishes flavors.  It’s almost like a pop of fresh flavor to accompany the long slow savory tastes of the main dish.  Traditional gremolata consists of parsley, lemon zest and garlic.  That’s it!

 I used the zest of one lemon, 2 garlic cloves, and handful of parsley.  Chop them all up together and mill together so it becomes a homogenous mixture.


Friday, July 29, 2011

Chicken Roulade w Homemade Pasta Sauce Pt. 2


Ah! Chicken Roulade! One of our favorite dishes.  Basically roulade is a fancy way of saying "rolled up".  This is such an awesome technique because you can do it with any meat and any stuffing.  Like check out my spicy pork roulade:
Spicy Pork Roulade

Instead of chicken I used pork tenderloin with jalapenos, cheese, onions, garlic and roasted red peppers.  The possibilities are endless! So let’s get to it!

Chicken Roulade
Ingredients
  • 3 boneless skinless chicken breasts
  • 1 cup of ricotta cheese (I used part skim)
  • 1/2 c. frozen spinach thawed and the water squeezed out
  • 3 garlic cloves (Yes this is a very garlicky dish- if you're not into garlic that much just use less)
  • 1 tsp salt
  • few grinds of fresh cracked pepper
  • ½ tsp red pepper flakes
  • ¼ c. shredded mozzarella cheese (if you don’t have mozzarella, you can substitute parmesan)
  • oil for frying
Directions

  1. First I got all my non-meat ingredients in order (my Mise en place - meez on plaz- which is all your ingredients ready and everything set up to go).  Take all the ingredients except for the chicken and oil and mix in a bowl until combined. I also preheated my oven to 350 degrees.
The left bowl is the filling, middle bowl is my onions and garlic for the sauce (see recipe later in this post) and the right one is just a bit of parsley chopped (basil would have been better to use, or you can just leave it out all together- it's just really for garnishing)


As you can see I divided my filling into portions so it would be easier to just grab and form to place inside the chicken later.

2. Next we take our chicken and butterfly them open like a book.  Careful not to cut through them, just take your time and work it as you go along.  After they are all butterflied, cover them with plastic wrap.


3.  Now take your meat mallet, heavy skillet or (I used) a rolling pin and pound out the breasts firmly but not too aggressive, you don't want to rip the chicken.  When you do this don't just pound straight down like you are beating the life out of it, but pound it in an outward sweeping motion towards the edges of the chicken.  You want to try and get an one even thin piece of chicken.


4. Now take our filling and roll into a little log.  Ricotta cheese makes this easy but if you are using other ingredients just lie out or sprinkle on one side of the chicken- like where we are placing the ricotta log.


5. Now we just roll up like a burrito and tie!  If you don't have kitchen twine, you can always use toothpicks.  I did a fancy butcher's knot wrap up thing (that we will have to save for a video blog!) then sprinkled with salt and pepper.
6. Heat up some oil in a pan.  I consider these roulades as having 4 sides- so fry them 2-3 minutes on each side to get them browned.  Try using an oven safe (or cast iron) skillet here so you can just put in the oven when you are finishing browning, instead of transferring to a baking sheet.  Either way works though.  We are putting it in the oven to finish cooking them.  I would say about 10-15 minutes (check with your meat thermometer!)

7. Slice on a bias (diagonal) and you have a pretty impressive dish.  Once you do this a couple times, it is so easy that you will be making it all the time and trying new combinations!

Homemade Sauce Part 2

Ingredients
  • 1 (28oz) can of whole peeled tomatoes
  • 1 small onion, chopped
  • 2 garlic cloves, minced
  • extra virgin olive oil-enough to cover the bottom of whatever pan you are using
  • ½ tsp salt
  • fresh cracked pepper
  • ½ tsp of dried oregano
  • ½ tsp of dried basil
  • ½ tsp of red pepper flakes
Directions
  1. In a sauce pan heat the oil over medium, medium-low heat.  Then add the onion and garlic (they shouldn’t be getting brown or burning; you are gently cooking them). 
  2. When the onion is soft add the tomatoes and mash them up with a potato masher (or a spoon).
  3. Add about ¼-½ cup of water.
  4. Add all the dried spices
  5. Bring to a boil and reduce to a simmer.  You want to simmer for about 20 mins.  If you start this before you do your chicken, it will be done by the time you are ready to eat.  Stir it every once in a while.  You really just need to let it simmer while you prepare the chicken roulade.  Always taste before you serve though.  It might need a bit more salt.
  6. Serve on top of pasta and along side your fancy shmancy chicken roulade.  Sprinkle everything with freshly grated parmesan or pecorino cheese.

Tuesday, May 24, 2011

How to Cook Perfect Pasta

dececcousa.com
PASTA! omg who doesn't love pasta, I mean talk about the ultimate comfort food.  There are so many different shapes and sizes and colors!  Why do they have all those different shapes anyway? Well basically besides looking appealing and fun it does serve a purpose.  Different shapes are meant to be used with a certain sauce- for example penne rigate (which is the penne most of us are familiar with probably) is good with lots of different sauces- from vodka sauce to marinara.  Rigate just means with lines or ridges- it helps hold the sauce onto the pasta.  (see photo)

For more info then you'll ever need on pasta shapes and what to use them with, check out the National Pasta Association website: http://www.ilovepasta.org/shapes.html

Cooking pasta correctly helps aid in adhering the sauce to the pasta.  Think it's all just throwing pasta into water? Let's see how much you know:

Getting Started
First step is having enough water- you need to fill your biggest pot with water to boil a pound of pasta.  You need a lot of water so the pasta starch has somewhere to go.  It also gives the pasta room to move around so it wont stick to each other.  What's that you're thinking? Boiling that much water takes forever? Here's a tip: Before you even start cooking anything else put the water on to boil-pasta should be the last thing you cook anyway because it only takes a couple minutes.  So by the time you are ready for the pasta, the water should be boiling.

What to Add
Next: what to add in the water: JUST SALT! no oil or fancy tricks your grandma swears by.  Why salt? Well salt flavors the pasta when it boils, you should be throwing in at least a handful of KOSHER salt.  It should taste close to ocean water. For a long time I thought- hey why not just add salt at the end? It seems like a huge amount of salt, but you cannot get that same flavor if you just throw salt on top.  Try it out- taste the pasta boiled with and without salt- I noticed the taste difference right away.  The pasta will absorb some of this salt but most will end up down your drain with the rest of the water (but hey salt is cheap, so don't worry).  I actually used to think that by adding salt it will boil faster- nope- another myth- it's all for the taste factor.

Oh, and about the oil: jeez do not add oil to the water- Ive heard nonnas say it helps by not having the water boil over- um why not just lower the flame? It also does not make your pasta not stick together- because duh oil and water don't mix (think vingarettes) if your pasta is sticking together see paragraph above about not using enough water.  AND the worst part about using oil is that in the end it will make your sauce slide right off the pasta- the starch on the pasta helps sauce stick- don't screw with it!

Cooking
Cook your pasta al dente, which means in Italian literally means "to the tooth" aka firm to the bite aka under-done.  We cook pasta al dente- just like we under cook meat a bit and then let it rest (meat finishes cooking becasue of the remaining carry-over heat) because when you mix the pasta with the hot sauce later it finishes the cooking process.  So what if you're just dressing with oil and butter- personally I would cook for a minute or so longer than if I mixed with a hot sauce and then serve immediately. 

Serving
Serve anyway you like. MmmMMm I wish I was eating some pasta right now! Usually, like I mentioned before, you toss with hot sauce and top with some fresh herbs (if you have).  Pasta, meatballs, some grated cheese and crusty bread is one of my fav meals.

Now make some perfect pasta with my Homemade Tomato Sauce, Part One tonight! and stay tuned for different sauce recipes- but remember the sauce wont matter if the pasta isn't cooking correctly! Buon appetito!

Monday, May 23, 2011

Homemade Tomato Sauce, Part One

I make my own sauce at home.  My wonderful boyfriend bought me a canning set for Christmas one year so now I make a huge batch then store them in my closet.  It is cheaper to make your own sauce, and I feel, way better for you.  Sauce is only a couple ingredients, it's really not rocket science- I never make the same sauce twice because I always just eye-ball the ingredients.  No fear- it always comes out awesome!  This recipe will be for one meal- but if you want to make a bunch just double, triple etc the recipe.  If you do make more than what you will be eating right away I would recommend you use it within a week or so of making.  If you don't have a canning set, what I used to do was make a whole bunch and put them in Tupperware (each one being for a meal) and let them cool completely, then just stack and pop in your freezer.  Take out that morning before work and it'll be good by dinner time :) Happy Sauce Making!!!

Side Note: In my recipe I use canned crushed tomatoes.  Some people will swear by the whole peeled tomatoes and you need to break them down with your hands or with the spoon but I'm just too lazy and I like the uniformed consistency of the crushed.  Why not use the can labeled tomato sauce? I feel it is too thin, the crushed gives the sauce a little "body".  But any type of canned tomato you like may be substituted in this recipe.

Also-you might hear a lot that you should use San Marzano canned tomatoes.  They are more expensive and chefs claim they make the best sauce.  You can get them right at Waldbaums, but whatever, you wanna get fancy get them- I just use the regular crushed tomatoes when it goes on sale.  As described by Wikipedia: Compared to the regular Roma tomatoes with which most people are familiar, Marzano tomatoes are thinner and pointier in shape. The flesh is much thicker with fewer seeds, and the taste is much stronger, more sweet and less acidic. They originated near the area of Naples, Italy.
http://en.wikipedia.org/wiki/San_Marzano_tomato

Ingredients:
  • 1 (28oz) can of crushed tomatoes (try and get the no salt added one)
  • 1 onion, chopped (I use the regular white ones)
  • 3 cloves of garlic, minced
  • 1 tablespoon each of dried basil* and oregano
  • 1 tsp of crushed red pepper flakes (you can go more if you like it spicier)
  • 2 tablespoons of salt (Kosher of course)
  • About 10 grinds of fresh black pepper
  • Olive oil- I use Extra Virgin
  • Dry white wine
  • About a 1/2 to one cup of water
*(If you have fresh basil- which the taste is always better with fresh herbs- but use about 10-15 leaves and throw them in at the very end- pretty much right before you serve the sauce)

Directions:
  1. In a sauce pan (or skillet) lightly coat the bottom of the pan completely with oil (I know it might sound like a lot but it is an ingredient in the sauce that makes it taste good-that is why I recommend using Extra Virgin)
  2. Heat the oil to about medium-medium high and then throw in the onions and garlic along with a pinch of salt and a couple grinds of pepper.  Do not let the garlic brown- it tastes bitter when it goes too far-if it seems like its getting brown too fast- turn the heat down.  Let the onions become translucent, then deglaze the pan with about a 1/2 cup of dry white wine.
So if you were just thinking OOOOOOOOOOOOhhhhhh DEGLAZING WTF IS THAT!? Lol-its just a fancy way of saying your using a liquid to scrape up all the stuff that is stuck to the bottom of your pan. And honestly you can use red wine too- or just skip the step all together if you dont have any wine.

3.  Let the wine cook out for a min or so then pour in your tomatoes and stir to combine.  Usually my sauce is a bit thick at this point-this is why I add a little water until I like the consistency BUT this step is completely optional- if your using a thinner canned tomato or like really thick sauce don't add water, it's really all personal preference. You definitely don't want this sauce to be too thin (that's sauce making part 2 recipe).

4.  This is when you add all your spices and stir to combine. Bring to a boil and then reduce to a simmer. I've eaten the sauce right away, but if you have the time, the longer it simmers, the better it is.  If you do simmer for a while and it seems that the sauce is reducing too much- just add a little water to get it back.  I would recommend using a cover when simmering the sauce- it splatters all over the place in my kitchen.  You just have to stir occasionally.

BUT if you're hungry right now- as soon as the sauce comes to a boil, reduce to a simmer and then throw your pasta in (a separate pot of boiling water obviously) and cook the pasta to al dente (aka about a min before it's done-see my how to make perfect pasta for more on this)  then toss with the hot sauce- by the time the pasta gets to your table (or your mouth) it'll be fully cooked!

Wanna eat now?! Make this sauce with Perfect Pasta tonight!
Related Posts Plugin for WordPress, Blogger...