Showing posts with label pasta. Show all posts

Tuesday, November 6, 2012

Braciole!


Before I get to all the facts about this recipe, I just want to say that my heart, thoughts, and prayers go out to everyone here in NY (and all over) that were effected by Sandy.  Hopefully this recipe finds you well and lucky enough to have a home to cook it in.  Maybe if you know someone that has had a loss, this would be great to make and invite them over, it's great for a lot of people, not a lot of work, and definitely warms your soul (and your tummy).  No matter who or what you believe in, I think this would be a good time to take a minute before eating this meal to really be thankful for what you have, because at this moment some people have nothing.  If anyone in the NYC/LI area needs a helping hand cooking or anything like that email me- I am free on the weekends. xoxo

On a lighter note, braciole is one of those dinners you cook all Sunday and is especially good for a chilly day- which we just started experiencing here in NY.

Braciole is an Italian dish, mainly thin pieces of beef rolled up and pan fried, then braised (cooked low and slow) in liquid.  Serve alongside some pasta (Rigatoni is my personal fav) and a salad with some bread for all the extra sauce.

Not exactly the healthiest meal, but it is easy and can feed a lot of hungry people.  This recipe takes about three hours to complete, so make sure you prep for that.

Also, since there are so few ingredients, I would definitely make the effort to use fresh herbs here.  I used a roast, then sliced it myself because it was the cut of meat that was on sale this week.  Try to get a cheap cut of meat, because we cook it so long that it is going to be super tender regardless.


Ingredients

  • A tough cut of beef- traditionally its flank steak, but I used bottom round roast and cut into thin slices, then pounded out thin.  The roast was a little over 3 lbs and made about 18 rolls.
  • 1 cup of bread crumbs
  • 1 handful of fresh parsley
  • small handful of fresh basil
  • 1/2 cup of pecorino cheese, grated
  • 2 tbsp of pine nuts, toasted
  • 5 cloves of garlic, minced (2 for the filling, 3 for the sauce)
  • salt, pepper, olive oil
  • 1 cup of red wine
  • 1 (28 oz) can of crushed tomatoes
  • 14 oz of water (just fill the 28 oz tomato can half way with water-good way to get all the sauce out of the cans too)
  • 1 (8 0z) can of tomato sauce
  • 1 red onion, chopped
  • 2 small carrots, chopped
  • 3 dried bay leaves
  • 1 tsp of red pepper flakes

Directions

  1. Preheat the oven to 300 degrees F.
  2. Combine the bread crumbs, parsley, basil, cheese, pine nuts, and 2 garlic cloves into a bowl. Mix to combine.
  3. In this case, slice your beef and then pound thin (you don't have to go to crazy here, just try and cut as thin as possible and then I just pounded a bit with my hands to flatten).  The last bit of beef was too small to make into slices so I just cut into small bite sizes which we'll just throw in along with the sauce. (No wasting here!)
  4. On each slice, top with some of our bread crumb filling and then tightly roll up and tie with some string (or toothpicks).  Definitely use the string, I think it makes handling them and frying them so much easier.
  5. In a large deep skillet or dutch oven, put heat on high and get some olive oil hot.  Season the meat with salt and pepper then fry each roll until brown on all sides (I had to do this in two batches to ensure correct browning).  Don't forget to brown the little bite sized left over pieces too!
  6. Remove all beef and reserve.  Then if pan is dry, add a bit more oil and saute the onion, carrot and 3 garlic cloves for a couple minutes until soft.
  7. Add the wine and deglaze the pan.  Let that cook out for a minute or two.  (If you don't have wine, or don't want to use it, use beef broth- but if you have the wine- SO use it- it tastes amazing)
  8. Then add your tomatoes- crushed and sauce.  Then add the water, bay leaves and red pepper flakes.  I added some salt and pepper.  Stir to combine. 
  9. Add your beef rolls back into the sauce.  Bring to a simmer, cover and then put into the oven. 
  10. Cook for one hour, then check on it- stir it.  Then put back in for another hour.  Check it again- if it's tender- eat it! If not, cook for another half an hour.  Before serving make sure you taste the sauce to make sure it is seasoned properly.
  11. Just boil some pasta and serve!


Wednesday, August 8, 2012

Zucchini Spaghetti w/ a Quick & Fresh Tomato Sauce


Super easy weeknight dinner that even the kids are going to have fun eating!  And no one will even know its healthy! ::haha:: Serve with my Homemade Sausage.

Cut down on carbs with this dish while getting your dose of veggies.  {I used whole wheat pasta for even bigger protein boost}  If you can find this in your grocery store pick it up! I found this in my pre-packaged produce section.  How cute is this package of zucchini!?


Sauce is super simple and takes minutes to come together- all you're waiting for is the pasta water to boil!


Ingredients

  • 1/2 lb of whole wheat spaghetti (yes! only 1/2 the box in necessary!)
  • about 1 lb of shredded-into-strings zucchini
  • 1 small onion, diced small
  • 2-3 cloves of garlic, minced
  • 2-3 plum tomatoes, diced
  • 1/2 cup of water
  • 2 tbsp of olive oil
  • 1 tsp of salt (or more to taste)
  • 1 tbsp of dried basil
  • pinch of red pepper flakes

Directions

  1. Get the water on to boil for the pasta.
  2. In a large sauce pot or skillet (bc when the pasta is done we will toss in with the sauce- need some room to toss)  over medium heat add the oil.
  3. When the oil is hot add the onion and saute until soft (about 5-7 minutes).  Then add the garlic, saute for a minute or so.
  4. Then add your tomatoes- cook for a minute or so- I like to squish them a bit in the pan so they release some juices. 
  5. Then add your spices.  Cook for a minute.
  6. Then add the water.  Bring to a simmer and keep on a low simmer until ready to serve.
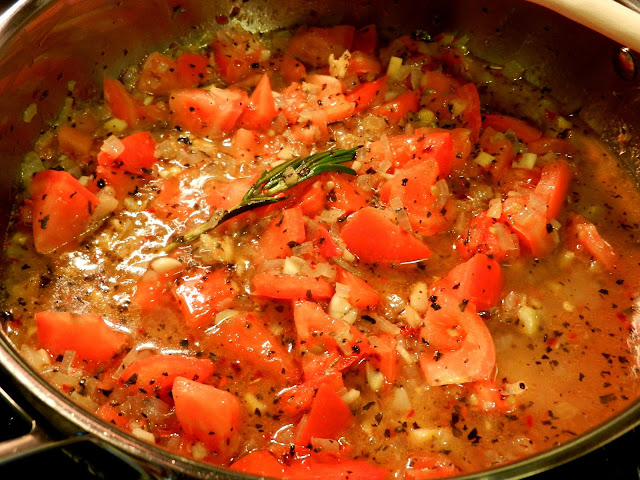
  7. (In the picture I used a small branch of rosemary too, bc I had rosemary in the sausage- but this is totally optional)
  8. When the pasta is al dente add it to the sauce pot along with your zucchini and toss until warmed through and zucchini is soft (zucchini is cut so thin it cooked in a minute or so)
  9. Serve topped with some parsley and grated romano!

Thursday, August 2, 2012

{No Skillet} Baked Ziti & Catering 101

So last Saturday I helped my Aunt with my cousin's graduation party.  I made 1 full tray of eggplant rollatini, pulled pork, assorted roasted veggies, tex mex rice, and 5 full trays of baked ziti.  She cooked dishes like chicken, bacon mac and cheese, penne ala vodka etc.  So we definitely had a nice spread. 

I love cooking and my family -so what better way to tie it all in as to help cater a party.  Unfortunately because of the rain the turn out wasn't as many as expected, but we still had a lot of people come- maybe 100 including kids.  I really hope to take this catering business further because I had a lot of fun with it. 

It is definitely some sort of art to prepare what I did in a kitchen so small with one oven.  Oh, and did I mention I have never made eggplant rollatini before.  It came out really good!{Thank God!}  I took this challenge on full force and bought wayyyy too much food (thank god for returns) and spilled some food in my trunk- gross (thank god for carpet cleaner). But overall it went great.

I also misread my Aunt's message and made WAY too much ziti- so here's a quick and easy recipe for baked ziti- because if I can make 5 full trays in one night, you can make some for your family for dinner :)

Oh, also baked ziti is supposedly traditionally made without ricotta cheese- but who wouldn't want ricotta cheese!? This is also a non-meat version- if you wanted to add meat- you would have to use a skillet ;)  And of course this isn't one of my healthier meals- but you can use part skim ricotta and mozzarella, plus whole wheat pasta for a "lighter" version- maybe swap some pasta for some veggies.

Ingredients
(I usually use a 9x13 casserole dish with this recipe)
  • Olive oil
  • 28 oz can of crushed tomatoes
  • 1 onion, chopped
  • 3 garlic cloves minced
  • 1 tablespoon of dried basil
  • 1 tablespoon of dried oregano
  • 1 tsp of red pepper flakes (or more if you like it spicy)
  • 1 cup of ricotta cheese (I usually use part skim)
  • 1 lb of ziti (or you could use rigatoni or penne or any tubular pasta you have on hand)
  • 1/2 cup or so of mozzarella cheese for the topping
Directions

  1. Preheat your oven to 400 degrees F
  2. Get your pasta water on to boil.
  3. In a small sauce pan- saute your onion in about 2 tbs of olive oil on medium.  After they get soft about 5 to 7 minutes add your garlic and saute about 2 minutes. 
  4. Then add your tomatoes to onion and garlic.  Add your spices and stir to combine.  (I like to add a bit of water to the sauce to make it a bit thinner- but this a personal preference)
  5. Bring the sauce to a boil, then reduce to a simmer- let simmer until your ready to assemble.
  6. When the pasta water is boiling, add your pasta and cook to al dente (because it will continue to cook in the oven)
  7. Get your casserole dish and add the sauce and ricotta cheese to it and mix to combine (I don't get crazy with mixing- it will all combine well when baking)
  8. When pasta is done add your pasta to the casserole dish and carefully toss the pasta (so no overflow) with the sauce and cheese.
  9. When that is done top the pasta with mozzarella cheese (If I have sometimes I like to use parmesean and mozzarella).  Cover with tinfoil and bake for 30 minutes.
  10. Serve and enjoy! Suggestion: serve with salad. 

I also apologize for no picture :( As you can see after I made all this food, I was just happy I was able to finish it all in time. Yea, 18 of those bad boys.

If anyone in the Long Island, NYC area is interested contact me at bstarcatering@gmail.com

Wednesday, July 18, 2012

Food to Boost Energy and Fight Fatigue (Rider Nutrition)

Now I am no nutritionist or expert by any means, so if you do have a serious problem you might want to speak to your doctor, but I have be researching a bit about food that helps boost energy, keeps you going and also fights fatigue.  When we go to the motorcycle track I need to feed Brendan food that will be beneficial to him for his performance and to not make him feel heavy or sluggish when he's out there holding down the throttle.

A phrase I like to keep in mind is the saying "garbage in-garbage out".  Meaning that if you fill yourself with foods that are processed and not nutritionally beneficially you might as well be eating dirt or shortening out of the can.

These are a couple great tips to help you even if you aren't an athlete.  Eating correctly will help you in your everyday life- because who wants to feel sluggish and tired.  That "3pm crash" commericals ::cough:: 5hr energy ::cough:: mention sluggishness can be combated with an overpriced little shot of B vitamins, caffeine and taurine- but instead you should be filling your body with healthy foods that are slow releasing that keep you going- examples being low fat protein or complex carbs.

Fluids
This is a huge factor in health and fitness- you need to keep your body hydrated.  The human body is made up of something like over 80% water- so yea, water is important- and I said WATER- not soda or juice.  We started carrying around the gallon jug of water instead of the little bottles- which definitely gets you to drink more water.  (Ever wonder why those huge guys carry it around at the gym? Yea, that's why)  I'm not a huge fan of sports drinks, but when you are intensely active- like when Brendan is racing his motorcycle (all zipped up in a full leather suit with temps soaring over 100 degrees at times) or you're in a marathon or playing hard at whatever- it is a good idea to have a couple of these drinks on hand- and that brings me to the next point...

Sodium
I know- this one was new to me too.  Which it kind of wasn't because if you think about when someone is in the hospital and they get an IV- it usually is saline solution for dehydratrion- which is essentially sodium.  Sodium helps to prevent cramping and helps you when the weather is extremely hot and/or humid.  This is where the sports drinks come in- they have sodium and also electrolytes which help keep the body going- but don't forget to drink lots of water in between or even mix your drinks half and half.  FYI you are also consuming a lot of sodium in foods you eat- so don't go dousing your food with table salt or anything like that- just be aware of how much you are consuming and when you are consuming it.  Here's an interesting article Water vs Sports Drinks.

A higher sodium intake yields a greater overall blood volume and blood flow to the working muscles. With increased blood flow, the amount of oxygen and nutrients delivered to the working muscles is maximized...It is the responsibility of sodium to deliver potassium into the cell membrane of muscle tissue {racerxvt.com}

Complex Carbs
If you have read anything about carbs lately these are the recommended ones.  Complex carbs are just what they sound like- carbs that are complex- they are made up of chains of three or more single sugar molecules linked together.  These usually contain fiber which helps slows down the absorption of the carbohydrates so you feel full longer and be less likely to over-eat throughout the day.  (Non complex carbs are made up of more refined sugars that spike blood sugar levels that give us that boost, but make us feel hungry and sluggish again later).  Now, if anyone that knows more about nutrition is reading this, I know there is WAY more that goes into explaining carbs (on the molecular level) but for us regular people- just eat high fiber, whole grain carbs.  Most importantly- look at the ingredient list of foods you buy- what are the top three ingredients- are they natural? healthy? pronounceable?  Brendan has also told me most riders carb load the night before and that it helps the next day- I have also read this in other areas, but that is usually for people that will be doing some sort of intense activity the next day.

Protein
Protein can be absorbed from meats and dairy for the most part.  Examples: Boneless skinless chicken breasts, fish, eggs, low fat yogurt, tofu, quinoa, almonds, other nuts, beans, even lean beef.  Protein helps muscle and helps keep you feeling fuller longer- just like your complex carbs.  Also provides certain vitamins and minerals, like iron, vitamin D etc.

So besides all the nutritional facts- a couple other tips caught my eye:
  1. Stretch. Some people forget how important this is.  For anyone- even in the morning when you wake up.  It helps blood flow, flexibility and helps us avoid injuries.  For any riders reading this- stretch your arms and forearms before to help combat the arm pump.
  2. Sleep. Easy one but it helps recharge and rebuild your body in every aspect.
  3. Booze. Yea- don't drink it.  Or just really try and not drink yourself into an oblivion.  We like to enjoy some beers and hang out after a long day on vacation- so we drink a bit earlier- try and get a couple glasses of water in between beers and before bed try and consume water.  Then we wind up going to bed earlier so the next day isn't that bad.  (By the way, drunk sleeping is not good for cell regeneration or rebuilding your body because the body is just trying to mainly push out all the toxins and not focusing as much on the other things- that's putting it very very simply)  Also if you are going to drink after doing something intense (running, riding, gym- sounds odd but)- make sure your first drink is a real recovery drink or water before putting back a couple beers to help your body recover properly. If you really want a boost to not drink- read this
  4. Hydration. Yes I'm bringing it up again.  It is important for well being, but also for people needing to loose weight- drink some water before you eat- your body might just be thirsty- not hungry.  Also how do you know if you are hydrated? Check your pee- if it is clear- you're good (unless you are taking some vitamin or supplements that would counter act this effect).  You also want to drink before you are actually thirsty- because if you're thirsty you are already dehydrated.  If you are active- Drink cold water because is absorbed more rapidly and will aid in decreasing body temperature.
  5. Fatigue. How do you know your even fatigued? Headaches, dizziness, nausea and cramping can all be first signs of (heat) exhaustion. 
  6. Fats. Seems like I left this one out- nope- it's there but just not directly mentioned- healthy fats you will be consuming mainly through the proteins- lean meats, nuts and dairy.  Other healthy fats can come from avocados, olives, and peanut butter.  They are important for your body- but just in moderation.
  7. Exercise. All articles I read mentioned exercising and conditioning your body for the "main event".  Example being- most moto guys will mountain bike, run, swim etc to prep their bodies for the intense rides (esp motocross).  Just like marathon runners don't wake up one day and decide to run the marathon that night.  Starting small is ok- even just for better over health- at lunch time, take a ten min walk to refresh your mind and legs.  Take the stairs, stretch, get to the gym, walk your dog a bit longer than usual, clean your house vigorously etc. 
  8. Eating at the correct times. Like right after a work out for example- eating the right food helps regenerate your muscle and refuel your body.  This is a great easy read article from Spark People
Random thought: I heard something so awesome- "If it has a food label on it- it's not food"  I just love that quote because you never wonder the nutritional facts on corn or a bag of dried lentils.  Because these foods are natural and good for you.  (Obviously this is not 100% true, but still it is a good guideline to think about) When you are in a supermarket -try and walk the perimeter- and venture into the aisles for only natural whole foods- like grains/pastas or canned veggies.  I'm sure you've all heard it before that the supermarkets set their stores up like this on purpose- you need to walk through the aisles to get to the real food- so you are more likely to see unhealthier foods and make an impulse buy.  Why do you think they put all those little candy bars up by the register?

Anyway- I know this was a bunch of reading, but every ounce of knowledge gained leads to every ounce of your waist lost :)


Main sources:
livestrong.com
racerxvt.com
mayoclinic.com
sparkpeople.com

Some on-the-road recipes to keep you eating like a (healthy) king:

Smashed Avocado and Chick Peas Sandwiches
  • These are so good.  I added a bit of garlic and topped with bacon on whole wheat bread.  Good fats from the avocado, complex carbs from the bread and protein from the chick peas all make this sandwich a great lunch filled with fuel to keep you going without weighing you down.  Top with cucumber slices or baby spinach to bump up the nutrition.


Fruit & Nut Breakfast Muffins
  • Start your day with this awesome portable breakfast that will fuel your morning.


Grilled Pizza
  • Because who doesn't love pizza!  And when you do this on the grill people do a double take- because they are like- Where did you get that pizza?!


Turkey Burgers
  • In a food processor (or by hand)- chop 1/2 red onion, a small pepper, and 2 garlic cloves.  Take a package of ground turkey (it's like 1.3 lbs) and mix that with the chopped veggies.  Crumble some feta cheese into that, some breadcrumbs and a palmful of McCormick's Montreal Steak Seasoning until the meat is firm enough to form a patties.  Form 4 large patties and grill until cooked all the way through since they are raw poultry.  Serve on buns.
  • These were one of the best meals I've ever had on the grill. The meat fell apart and was still super juicy and flavorful.  Something that is hard to achieve in boneless skinless chicken breasts.


Grilled Veggies

  • You can also throw some pre cut veggies into a ziplock with oil salt and pepper and then just put on the grill when ready- our favs are asparagus and zucchini.


Wednesday, June 13, 2012

Weeknight Pasta w/ Simple Garlic & Oil Sauce


So after work I usually hit the gym and by the time I get home it is kind of late to be eating dinner- especially since the soon-to-be hubs has to wake up at 5am for work.  So this is a quick pantry made pasta dinner that you can either eat by itself or through in some chicken to round the mean out with some more protein.

This recipe is as easy as boiling water and heating up some garlic but with a couple extras thrown in- it was SUPER delicious- and when I say super- yea, I mean it. Super like Brendan had three servings. Yea, as I said, super delicious. But yet super simple! Impressive and delicious. Boom.

*Now, when you are reading the directions this ingredient might freak you out.  But stop being such a wussy! Have you ever even tried anchovies? (For all the people that said "yes, on a pizza"- you don't count because that is probably the worst way people know it and obviously get turned off by it.) So in a different question- have you ever cooked with anchovies? Believe me, I guarantee you, you will not even taste them.  It will not taste fishy.  When anchovies are heated, especially in oil they dissolve and disappear into the oil and just become a flavor- sort of like a salty nutty flavor.  It adds so much depth of flavor into this sauce.  You really don't want to skip it; it's the secret ingredient that makes it special, but still an easy weeknighter recipe.  I told Brendan they were in it and he said "ew"- then he had three servings.

But for all the haters and wussies out there- if you must substitute I guess you could use a couple dashes of Worcestershire sauce (which anchovies are one of the ingredients in that sauce, so if you've used it before- you've had anchovies).

Ingredients

  • 1 lb of pasta of your choice (I chose whole wheat rotini)
  • about two cups of broccoli (I had some in the freezer)
  • 1/4 cup of oil (I used extra virgin, you could also use regular olive)
  • 4 garlic cloves, grated or minced
  • 4 anchovy fillets*
  • 1 lemon, zest and juice
  • 1 tbsp of red pepper flakes (yes, this is a lot- if you want less spice start with a heavy tsp)
  • pinch of salt (bc anchovies and cheese will add salt)
  • freshly cracked pepper
  • 3/4-1 cup of pasta water (so remember don't dump it before reserving a cup)
  • 1 cup of pecorino or parm, shredded or grated

Directions

  1. Boil water for the pasta.
  2. If you have frozen broccoli- defrost in the microwave. If fresh we will wait to blanch in pasta water at the end.
  3. Heat a sauce pot over medium low heat and add the oil, garlic and anchovies.  You can add the anchovies whole, they will eventually just dissolve into the hot oil.  Do not let this burn, just gently bubble and heat up for a couple minutes so the oil gets flavored.
  4. After the anchovies "disappear" and the garlic slightly golden.  Turn the heat to low and add the lemon juice and zest along with the red pepper flake, salt and pepper.
  5. Keep on low heat for flavors to marry for about 5 minutes.
  6. Meanwhile when water boils, salt the water and drop your pasta.  I semi-defrosted my frozen broccoli, so about 2 minutes before the pasta was done I added the broccoli to the boiling water.  If you are using fresh you would do the same- drop into boiling water just a couple minutes before the pasta is done.
  7. RESERVE your pasta water!  Add it to the sauce pot and mix to combine.
  8. Drain pasta and broccoli and add to a large boil for mixing.  Then top and toss with your sauce. 
  9. Top with shredded cheese and serve!  You can also add a bit of cheese and toss with pasta to add more body to the sauce.
I served this alongside some pan fried boneless skinless chicken breasts simply seasoned with salt and pepper.

Thursday, June 7, 2012

Lemon Basil Penne


Oh this was so good.  Simple to make too. Serve along side some thin grilled cutlets for a quick weeknight meal!

Ingredients

  • 3 lemons, juice (and zest of 2)
  • 1 cup of cheese- I used pecorino, but you could use parm or even mozzarella
  • 2 garlic cloves, minced
  • 2 tbsp of butter (I used I can't believe it's not butter)
  • 1/2 cup of low fat milk (I used 1%)
  • 1 tsp of cornstarch
  • about 1 lb of asparagus
  • about 20 basil leaves, chiffonade (aka cut into ribbons)*
  • salt and pepper
  • 1 lb box of penne pasta (using whole wheat is even better!)
Directions

  1. Get water boiling for your pasta.
  2. In a small sauce pot add the butter and the garlic.  Cook that on low for a couple minutes to let the butter infuse with the garlic flavor.
  3. Then add the lemon juice and zest. (Note: the garlic may turn green/blueish color- don't worry it is just reacting to the acid in the juice)
  4. Side note: Never let this sauce come to a boil
  5. While the lemon juice is heating through add the tsp of cornstarch to your low fat milk- if you are using cream or whole milk this step is unnecessary.  Stir until combined and then add to the pot while whisking. 
  6. Quickly add the cheese and whisk until combined.  Taste it- see if you want to add more salt, add pepper if desired.  When that is all heated through and a creamy sauce consistency, turn off the heat and cover to keep warm.
  7. When the water boils add salt and then your pasta. 
  8. Cut your asparagus into short pieces, similar to the size of the penne.  When the pasta is almost done add the asparagus to the water and let the pasta and asparagus finishing cooking together.
  9. Drain pasta/asparagus and add to a large serving bowl.  Pour the sauce on top and add basil- mix until everything is combined.
  10. You can add a bit of extra virgin olive oil and more cheese on top if desired.
*To chiffonade basil stack up all the leaves and roll them up into a little log.  Then slice.  You will end up with pretty ribbons.

Thursday, May 10, 2012

Pasta with Creamy Broccoli Sauce


When you are craving a creamy Alfredo sauce this is a good swap.  It is creamy but way lower in fat.  Also the edition of broccoli is optional, but gives that extra nutritional boost and color pop!  Instead of incorporating the broccoli into the sauce you can always just serve steamed on the side (you could even pour a little extra sauce on it)

I used a long noodle pasta, but any pasta will do- try linguine!

Ingredients

  • 1 pound of pasta of your choice
  • 3 tbsp of a butter substitute (e.g. I cant believe it's not butter)
  • 1 shallot, minced
  • 3 garlic cloves, minced
  • 1 tsp of fresh thyme
  • 3 tbsp of flour
  • 1/2 cup of white wine
  • 1 cup of chicken stock
  • 1 cup of low fat milk (I used 1%)
  • 1/2 tbs of corn starch
  • 2 tbs of non fat yogurt (or you could use low fat cream cheese)
  • 1/2 cup of pecorino cheese (or parm)
  • For the broccoli: 1 1/2 cups of broccoli florets & 1 cup of pasta water and a food processor/blender)
Directions

  1. Get your water boiling for you pasta.
  2. Meanwhile in a sauce pot add the butter and heat over medium heat.
  3. When the butter melts add your minced shallot and garlic cloves
  4. Season with a pinch of salt and pepper. Then add the thyme.
  5. Cook for about 5 minutes until softened. Careful not to burn the mixture, lower the heat if cooking too much.
  6. Deglaze the pan with your wine. Cook until the wine almost completely evaporates.
  7. Sprinkle in your flour.  Mix and cook for about one minute to get rid of the flour taste.
  8. Now whisk in your chicken stock- stir until everything is a smooth mixture.
  9. Measure out your milk in a measuring cup and add the corn starch BEFORE adding to the pot.  Stir until the milk and corn starch are completely mixed. Add the milk mixture. DO NOT LET THIS COME TO A BOIL. If you are using low fat milk do not let this come to a boil- it will cause the milk to separate and your sauce will taste gritty.
  10. Add your yogurt and cheese.
  11. Whisk everything until a combined mixture.  (This would be the opportune time to cook off your pasta)  Cook the sauce for 5-10 minutes until thick enough to coat the back of a spoon. Turn off the heat and let sit for a couple minutes to thicken up even more.
  12. For the broccoli part: in a food processor add the broccoli and carefully add one cup of that salted pasta cooking water.  The pasta water will be hot enough to just cook the broccoli but still let it maintain its bright green color.  It also adds some seasoning to it as well.  Blend until it is a thick paste.
  13. In a large pot or bowl, add your drained pasta, about 3/4 of the sauce and broccoli paste.  Stir until all combined.  I leave a bit of sauce to the side to add to the top later or use for something else I cooked with the pasta- like my Mayo Crusted Chicken.
  14. Plate and garnish with a bit more sauce and shredded cheese!

Thursday, January 5, 2012

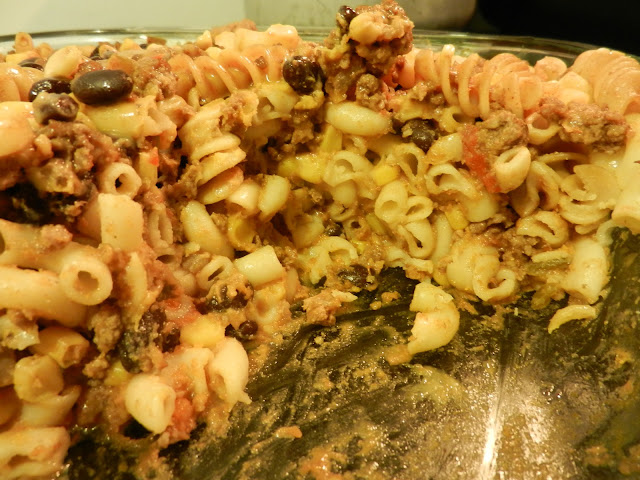
Beefy Southwestern Casserole

So this is basically a hamburger helper but way more delicious.  When I tasted this it was amazing.  Also super easy to make.  Originally I was making tacos but I got lazy and made a casserole instead.

Potential other names for this dish:
Beefy Burrito Casserole
Taco Pasta Casserole
Beefy Taco Casserole
and the list goes on...

If you wanted to add things like fresh peppers and onions that would be great in here too.

Ingredients

  • 1 pound of pasta- your choice.  I used half whole wheat rotini and half regular elbows
  • 1 1/2 lb of ground beef
  • 1 cup of salsa
  • 1 cup of cheddar cheese, plus a little more for sprinkling on top
  • 1 can of beans, drained and rinsed- I obviously used black beans
  • 1 can of corn, drained
  • 1 packet of taco seasoning (usually I make my own but we all cut corners sometimes)
Directions
  1. Preheat your oven to 350 degrees F
  2. Boil water for the pasta, cook until al dente, drain and reserve
  3. (If you are adding fresh ingredients like peppers or onion cook them in the skillet before the meat.  Cook only a couple minutes then incorporate them into the meat while browning.)
  4. In a skillet brown the meat and crumble.  I followed the directions on the taco seasoning packet- when the meat is brown, drain and then add the seasoning and about 1 cup of water.  Heat until thick.
  5. In a big bowl or right in a large 9 x 13 casserole dish mix the pasta, meat, cheese (leave some for the top!), salsa, beans and corn.
  6. Sprinkle the top with some cheese, cover and pop in the oven for 20 minutes. 
  7. If you wanted a brown cheesy top- turn on your broiler, remove the foil and let it sit under the broiler a couple minutes until brown and bubbly.
  8. Top with jalapenos, sour cream, more salsa etc- whatever you like on your tacos!

Monday, October 10, 2011

Winter Squash- Spaghetti Squash

Winter squash are awesome.  They are healthy, cheap, can feed an army and are easy to prepare.  There are definitely a couple varieties but this particular installment will focus on Spaghetti Squash.

I simply made this as a side dish but the best part about this squash is that if you are watching your carb intake- just scoop out the flesh and top with your favorite tomato sauce.  Yea, it's that easy- it has a subtle nutty flavor and is way healthier for you then pasta.

  • All you will need is a spaghetti squash- I think mine was about 5 lbs (bought it at 79cents a pound), salt, pepper and some oil.
  1. Preheat your oven to 400 degrees F.
  2. Cut the squash open longways and scoop out the seeds. Save the seeds! (Ill show you what to do with them later)
  3. Sprinkle the inside flesh with salt, pepper, and oil- rub all over the inside so it is all coated.
  4. Flip the squash so it is cut side down on a baking sheet.
  5. Roast in the oven about 20-30 minutes, size will effect cooking time.  You know it is done when you poke it and it is soft to the touch.
  6. Don't worry if it get a little brown.
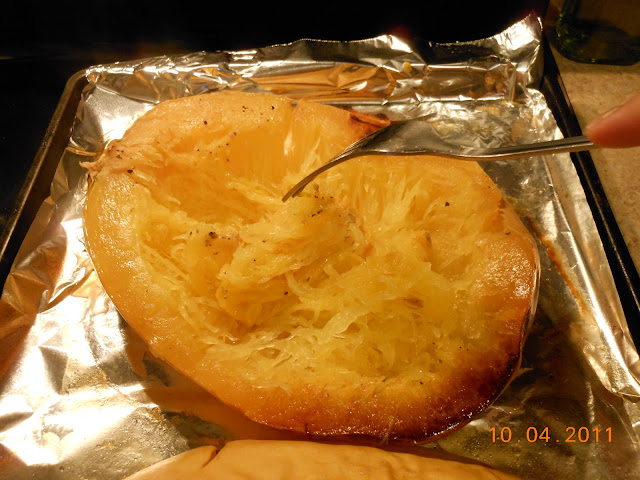
  7. When done, flip over carefully, it will be very hot and steam will escape from the underside.  If you cooked it enough the flesh should peel right away from the skin.

No mystery why they call it spaghetti squash!


And that's it! Top with salt and pepper or your favorite sauce. 

Now, what about those seeds- I think the seeds are my favorite part! If you have ever roasted pumpkin seeds- this is exactly the same thing.  Seeds are a little smaller, but taste exactly the same.

So after you scoop the seeds out, clean them up a bit and try to separate the seeds from the stringy flesh stuff.  You can rinse them off if you like. 

When cleaned, lay out evenly on a baking sheet and sprinkle with salt.  Pop in the oven alongside your squash (at 400 degrees) and roast for a couple minutes until brown.  It will take about 10 minutes.  Then just eat!  You can do this with any type of squash.

Monday, September 26, 2011

Freeze Your Own Broccoli + Chicken, Pasta & Broccoli Cassserole

So when fresh broccoli is on sale (for me it's usually 99cents/lb for the crowns) I stock up and freeze my own broccoli- it is cheaper then buying it already frozen and super easy to do.

As you can see I bought a lot of broccoli.  It looked like a lot more than this too- but don't forget to figure the amount you buy will shrink down a bit


First things first: get a large pot of water on to boil.  While that is heating up cut the florets off the stems but DONT THROW THEM AWAY! (I'll show you what to do with them in a minute) Pile all your florets in a colander and rinse.  I used two colanders for this.  In the yellow bowl I saved some florets for the following recipe and set aside.  When the water comes to a bowl, salt generously and dump your florets in.  Obviously you can do this in batches if you have a lot of broccoli.  Leave them in there until they turn a vibrant green (like in the picture above) and then immediately remove them- they should only be in the hot water for not even a minute.  You can either shock them in ice water- or just run them under cold water until they cool down (too much work for me to deal with that much ice).  If you are making the following recipe don't dump your water out from the pot, we'll use it later for the pasta.  When cool enough to handle pile in bags, get as much air out as possible and pop in the freezer! It's that easy!


One thing is that you NEED to blanch before freezing- believe me, I don't know why, but I've tried just putting in the freezer raw, and that doesn't work out.  And when you want to eat the broccoli, just cook like you would cook normal store bought frozen. 

Let's get back to those stems now...This of course is completely optional, but the stems are full of nutrients and you paid for them, so why throw them away?  Personally, I am not a huge stem fan, but I saw this technique on tv and thought it was such an awesome idea.  We're gunna make broccoli stem coins...


How cute are these?!


Your coins will vary in size and shape depending on your stems.  Also using a mandoline here makes quick work of this.  First, using a vegetable peeler, peel the outer layer of the stems if they look woody and dry.  Pick off any little leaves if you desire.  The broccoli I bought was so gorgeous and fresh that the stems were tender and small (because they were the crowns, but you can do this with regular broccoli too) I quickly peeled the outer layer, rinsed and cut on the mandoline into small, thin coins like you see above.

Now, what do you do with these?  Seriously the possibilities are endless.  Think of them as peas or water chestnuts.  Throw a handful into soups, stews, casseroles, salads, stir-fry’s, etc.  I've even eaten them just raw like chips.  I haven’t frozen them yet, but instead of blanching them like the florets, all I would do to make them freezer ready is dump into a microwavable dish, add a splash of water, and nuke for about 30 secs-1 min.  Then just pop back into the bag and freeze. 

And now finally onto the eating part!

I love love love casseroles. I just said the other day that I completely stopped making casseroles like I used too. Tragic really, they are so good and so easy to make and you can even make them the day before!

Chicken, Pasta and Broccoli Casserole

Ingredients

· 3-4 boneless skinless chicken breasts
· about 2 cups of broccoli florets we reserved before
· 1 box of any short cut pasta you like (I used rotini)
· 3 cups of chicken broth
· 2 tbs butter
· 2 tbs flour
· about 1-2 cups of any cheese you like (I used cheddar)

Directions

1.      Preheat your oven to 400 degrees F.
2.      Get a pot of water boiling for the pasta- if you did the broccoli blanching above then just use the same water that you blanched the broccoli in, no need to use new water.  Just remember to salt the water again before you add the pasta.  When pasta is done, drain and reserve.
3.      Cut your chicken breasts into bite sized pieces.  In a skillet heat some oil and when it is hot cook the chicken and season salt and pepper.
4.      When the chicken is cooked through, remove and reserve.  Next, add a bit more oil if needed and cook the broccoli (season with salt and pepper) just until bright green.  You can also add here other veggies, garlic, onions etc but I went quick and simple with just the broccoli.  Oh and plus I threw a handful of the broccoli coins in too.
5.      When that is done remove and reserve alongside the chicken.
6.      In the skillet reduce the heat and add the butter.  When the butter melts add the flour and cook the roux for about a minute or so.  Then whisk in your chicken stock.  Bring to a boil and cook until thickened.


7. Combine all pasta, broccoli and chicken in a casserole dish and pour the thickened sauce all over it.  Top with cheese and cover.

8. Cook for about 20- 30 minutes, then uncover and cook until the cheese gets nice and brown and bubbly (you might have to use the broiler for this part).

Technically, this dish is able to be served right away since everything is basically cooked.  But cooking it in the oven marries everything nicely.  And it also roasts the broccoli a little, which is so good, definitely my favorite way to eat broccoli, it becomes almost nutty.  If you are strapped for time just top with cheese and pop under the broiler until the cheese is melted and bubbly.


Thursday, September 15, 2011

Pollo alla Cacciatora (Chicken Cacciatore)

Chicken Cacciatore aka Hunter's Chicken.  (Just a heads up this isn't a super quick meal) The name comes from when hunters would come home with freshly hunted game and the wife would cook it up with some tomatoes/veggies, wine and aromatics.  The mushrooms in the dish compliment it's earthy, home cooked aura.  I have seen countless versions of this recipe and this is a dish where each family has their own, but traditionally it will consist of a whole chicken (cut into 8 pieces), tomatoes, wine and mushrooms.  We are essentially braising (cooking low and slow) the chicken to make the tough cuts of meat fall off the bone tender and delicious.  This dish is basically impossible to overcook and definitely calls for red wine and a loaf of crusty bread to be its accompaniment.  Oh, and did I mention it's is easy to make- it's just really cutting up veggies.

One side note is that I used bacon.  Traditionally this dish uses pancetta (which is an Italian version of bacon- it is just not smoked).  You can use either or none.  I can never find pancetta so I just used bacon.  I mean who doesn’t love bacon?

Oh and regarding the chicken- I have made this dish many times with different pieces of chicken, from boneless skinless breasts to thighs and drumsticks only.  It is totally up to you, what's on sale, what you have lying around etc.  Thighs and drumstick family pack with skin and bones were on sale, so I picked up a pack and used 6 thighs and 2 legs.  When it was cooked I pulled them out of the sauce and removed the bones and skin as you can see from the picture above. Whatever you do is totally up to you though, I just wouldn't forget the bread to mop up all that delicious sauce. Buon appetito!

Ingredients
  • About 2-3 pounds of chicken, whatever cuts you like.  It would be about 4 chicken breasts, 6 thighs and 2 drumsticks, 1 whole chicken cut into 8 pieces, or any combination of chicken you like that fits in the pan you're using.
  • Flour for dredging
  • 1/4 pound of pancetta (or bacon), chopped
  • 1 large onion, chopped
  • 1 red bell pepper, chopped
  • 10 oz mushrooms, sliced or chopped into chunks (I used baby portabellos, but use whatever you like.  10 oz is usually the standard package at the store)
  • 3 cloves of garlic, minced
  • 1 cup of white wine
  • 1 cup of chicken stock
  • 1 (28oz) can of crushed tomatoes
  • 1 tsp of each the following spices: rosemary, thyme, oregano & red pepper flakes (feel free to add more or less of any of these)
  • 2 bay leaves
  • Salt and pepper (of course)
Directions

1.      Preheat the oven to 350 degrees F.
2.      In a large deep sided skillet or dutch oven heat some oil over high heat
3.      Season your chicken pieces with salt and pepper, and then dredge them in flour.  Make sure to shake off excessive flour.  If you are using skin-on sear the skin side first.  (Also- if you are using skin on you can choose to skip the flour dredging)
4.      When chicken is seared remove from the pan and reserve.  If there is a lot of oil is the pan, dump it out and add just a splash of new oil.  (The point here is to not have a lot of oil in the pan, just enough to help the bacon/pancetta start rendering.  The bacon will provide a bit more fat for the veggies later)
5.      Add bacon or pancetta.  Cook for a couple minutes until it starts to get crispy, you can lower the heat a bit here- like to medium high.
6.      When that is done add your onion, pepper, garlic and mushrooms.  Season with salt and pepper and the rest of the spices (except bay leaves).
7.      Let those cook until the mushrooms are brown and the rest of the veggies soft. About 10 minutes I would say.
8.      Add the wine and deglaze the pan.  Cook the wine for about a minute then add the chicken stock and tomatoes.  Taste it and see if it needs more salt and pepper- it most likely will.
9.      Snuggle the chicken pieces back into the pan and add the bay leaves.  Bring this up to a boil, then cover and put into the oven.  You can cook this on the stove top but I find it easier in the oven.
10.  I cooked the chicken covered at 350 for 30 mins, then stirred it, uncovered it and then raised the heat to 400 degrees and cooked it uncovered for another 30 minutes.  (Basically it should just be bubbling gently in the oven).
11.  I served over cavatappi pasta and topped with pecorino cheese.  Don't forget the bread!


Monday, August 29, 2011

Braised Pork w Gemolata


Ah, now this is a meal Nonna would be proud of.  So simple, yet so delicious and heartfelt.  The only hard part about this dish is waiting for it to be done.  It will take about 2 to 3 hours of cooking time.  The best part about this dish (besides the taste of course) is that you can use this method on any type of meat.  I adapted this version from Chef Anne Burrell’s Braised Lamb Shanks.  Instead of lamb shanks I used the skinny end of the huge pork loin I buy and section myself (the two “pork tenderloin” pieces as I described them in an early post).  Originally I was going to serve this dish with polenta (I think Anne paired the lamb with polenta too) but when it was cooking the smell of the house just screamed “Italian Sunday” so I paired it with some medium shells.  I plan on using this recipe next time I have guests over.


Ingredients

·         About 2 pounds of pork loin

·         1 big onion

·         3 carrots

·         3 celery ribs

·         4 garlic cloves

·         2 (6oz) cans of tomato paste

·         2 cups of chicken stock

·         2 tsp each of dry rosemary, thyme, red pepper flakes and salt

·         3 to 4 cups of water

·         3-4 bay leaves

·         Gremolata (optional and recipe follows)

Directions

1.       Preheat the oven to 400 degrees F

2.       Using a pan that will be able to go into the oven later (I used a high sided skillet, but a dutch oven will work great too), coat the bottom of the pan with oil and put over high heat.

3.       Season the meat with salt and pepper generously and brown on all sides.  Be careful the oil is very hot and might spit at you.

4.       As that browns, cut all your veggies into big chunks and process in a food processor or blender until it is like a veggie paste. 

5.       When the meat is done browning, remove from the pan and set aside for now.  Add the veggie paste and season with salt and pepper.


6.       You are going to cook the veggies until it forms a brown crust on the bottom of the pan.  This will take about 20 mins.  When it’s ready it should look like this:


7.       Add the tomato paste and cook for 5 minutes.

8.       Then add the stock (or you can use red or white wine too here) and spices

9.       Cook this until reduced by about half.

10.   Add the meat back into the pan.  Add the bay leaves as well.  Add the water until the meat is fully submerged (or almost fully submerged, mine stuck out a little). Cover the pan with foil.

11.   Cooking time will vary depending on your meat choice, but this is what I did:

a.       First 45 mins, then flip

b.      Second 45 mins, flip again and take off foil

c.       30 more minutes and then done

Boil pasta of your choice and serve topped with pork and gremolata.

 Some good tips from Anne Burrell’s recipe,were that if the water reduces too much, just add more.  Also, if you have a fatty meat you might have to skim the fat as you go.  I chose a lean meat so there was no fat to skim.

 Gremolata

So what is gremolata anyway?  It is a traditional topper (condiment) for long cooked meals to help brighten up the dishes flavors.  It’s almost like a pop of fresh flavor to accompany the long slow savory tastes of the main dish.  Traditional gremolata consists of parsley, lemon zest and garlic.  That’s it!

 I used the zest of one lemon, 2 garlic cloves, and handful of parsley.  Chop them all up together and mill together so it becomes a homogenous mixture.


Related Posts Plugin for WordPress, Blogger...