Showing posts with label tomato. Show all posts

Monday, September 17, 2012

Poached Egg Breakfast Sandwich


Start your day off right with a fancy looking open faced sandwich!  I was inspired to make this after watching Bobby Flay make something similiar.  This would be perfect for a brunch- super easy to make and filling yet not heavy.

Poaching eggs are so easy and really lends itself well to the roll it sits on.

There are lots of ways to make this sandwich, so if you want to make substitions, feel free.

Ingredients
(1 sandwich)

  • 1 egg, poached
  • 1/3 cup of cheese, shredded (I used parmesean)
  • 2-3 tomato slices
  • kaiser roll, split in half (you'll only need one half for each sandwich)
  • oil, salt, pepper, red pepper flakes
  • handful of arugula
  • white vinegar

Directions

  1. To Poach Eggs:  Fill a pot with water and bring to a boil.  Once it comes to a boil reduce heat so it is right before a rolling boil (you want the water with basically no bubbles, just really hot).  Add 2-3 tbsp of vinegar to the water.  Break the egg in a small bowl first so its easy to transfer to the water.  Add the egg gently to the water and swirl the water around the egg a bit so the whites form around the yolk.  Cook for about 5 minutes.  Remove with a slotted spoon and lay gently on a paper towel to dry off excess water.
  2. To assemble the sandwich:  Brush or drizzle oil on the bread and season with salt and pepper.  Toast under the broiler until brown and crispy.  Then top with cheese- put under the broiler again to melt cheese.  Lay sliced tomatoes and season with salt and pepper.  Add the arugula and then gently lay the egg on top.  Sprinkle with salt and pepper and red pepper flakes if you want. 
  3. Cut a small slit in the egg and let the yolk run down all over the sandwich.
Enjoy with a bloody mary!


Wednesday, August 8, 2012

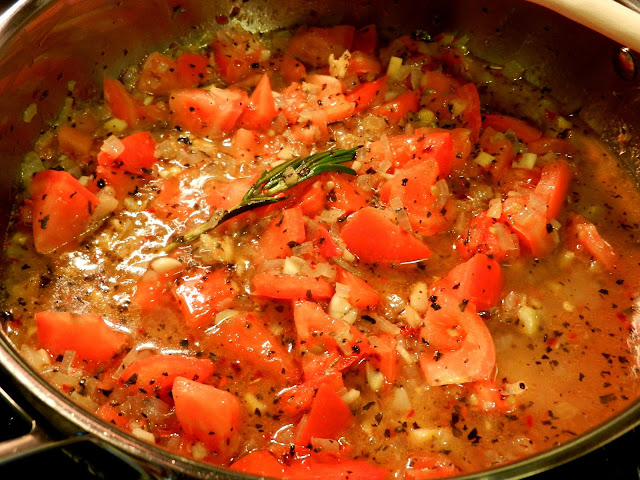
Zucchini Spaghetti w/ a Quick & Fresh Tomato Sauce


Super easy weeknight dinner that even the kids are going to have fun eating!  And no one will even know its healthy! ::haha:: Serve with my Homemade Sausage.

Cut down on carbs with this dish while getting your dose of veggies.  {I used whole wheat pasta for even bigger protein boost}  If you can find this in your grocery store pick it up! I found this in my pre-packaged produce section.  How cute is this package of zucchini!?


Sauce is super simple and takes minutes to come together- all you're waiting for is the pasta water to boil!


Ingredients

  • 1/2 lb of whole wheat spaghetti (yes! only 1/2 the box in necessary!)
  • about 1 lb of shredded-into-strings zucchini
  • 1 small onion, diced small
  • 2-3 cloves of garlic, minced
  • 2-3 plum tomatoes, diced
  • 1/2 cup of water
  • 2 tbsp of olive oil
  • 1 tsp of salt (or more to taste)
  • 1 tbsp of dried basil
  • pinch of red pepper flakes

Directions

  1. Get the water on to boil for the pasta.
  2. In a large sauce pot or skillet (bc when the pasta is done we will toss in with the sauce- need some room to toss)  over medium heat add the oil.
  3. When the oil is hot add the onion and saute until soft (about 5-7 minutes).  Then add the garlic, saute for a minute or so.
  4. Then add your tomatoes- cook for a minute or so- I like to squish them a bit in the pan so they release some juices. 
  5. Then add your spices.  Cook for a minute.
  6. Then add the water.  Bring to a simmer and keep on a low simmer until ready to serve.
  7. (In the picture I used a small branch of rosemary too, bc I had rosemary in the sausage- but this is totally optional)
  8. When the pasta is al dente add it to the sauce pot along with your zucchini and toss until warmed through and zucchini is soft (zucchini is cut so thin it cooked in a minute or so)
  9. Serve topped with some parsley and grated romano!

Thursday, August 2, 2012

{No Skillet} Baked Ziti & Catering 101

So last Saturday I helped my Aunt with my cousin's graduation party.  I made 1 full tray of eggplant rollatini, pulled pork, assorted roasted veggies, tex mex rice, and 5 full trays of baked ziti.  She cooked dishes like chicken, bacon mac and cheese, penne ala vodka etc.  So we definitely had a nice spread. 

I love cooking and my family -so what better way to tie it all in as to help cater a party.  Unfortunately because of the rain the turn out wasn't as many as expected, but we still had a lot of people come- maybe 100 including kids.  I really hope to take this catering business further because I had a lot of fun with it. 

It is definitely some sort of art to prepare what I did in a kitchen so small with one oven.  Oh, and did I mention I have never made eggplant rollatini before.  It came out really good!{Thank God!}  I took this challenge on full force and bought wayyyy too much food (thank god for returns) and spilled some food in my trunk- gross (thank god for carpet cleaner). But overall it went great.

I also misread my Aunt's message and made WAY too much ziti- so here's a quick and easy recipe for baked ziti- because if I can make 5 full trays in one night, you can make some for your family for dinner :)

Oh, also baked ziti is supposedly traditionally made without ricotta cheese- but who wouldn't want ricotta cheese!? This is also a non-meat version- if you wanted to add meat- you would have to use a skillet ;)  And of course this isn't one of my healthier meals- but you can use part skim ricotta and mozzarella, plus whole wheat pasta for a "lighter" version- maybe swap some pasta for some veggies.

Ingredients
(I usually use a 9x13 casserole dish with this recipe)
  • Olive oil
  • 28 oz can of crushed tomatoes
  • 1 onion, chopped
  • 3 garlic cloves minced
  • 1 tablespoon of dried basil
  • 1 tablespoon of dried oregano
  • 1 tsp of red pepper flakes (or more if you like it spicy)
  • 1 cup of ricotta cheese (I usually use part skim)
  • 1 lb of ziti (or you could use rigatoni or penne or any tubular pasta you have on hand)
  • 1/2 cup or so of mozzarella cheese for the topping
Directions

  1. Preheat your oven to 400 degrees F
  2. Get your pasta water on to boil.
  3. In a small sauce pan- saute your onion in about 2 tbs of olive oil on medium.  After they get soft about 5 to 7 minutes add your garlic and saute about 2 minutes. 
  4. Then add your tomatoes to onion and garlic.  Add your spices and stir to combine.  (I like to add a bit of water to the sauce to make it a bit thinner- but this a personal preference)
  5. Bring the sauce to a boil, then reduce to a simmer- let simmer until your ready to assemble.
  6. When the pasta water is boiling, add your pasta and cook to al dente (because it will continue to cook in the oven)
  7. Get your casserole dish and add the sauce and ricotta cheese to it and mix to combine (I don't get crazy with mixing- it will all combine well when baking)
  8. When pasta is done add your pasta to the casserole dish and carefully toss the pasta (so no overflow) with the sauce and cheese.
  9. When that is done top the pasta with mozzarella cheese (If I have sometimes I like to use parmesean and mozzarella).  Cover with tinfoil and bake for 30 minutes.
  10. Serve and enjoy! Suggestion: serve with salad. 

I also apologize for no picture :( As you can see after I made all this food, I was just happy I was able to finish it all in time. Yea, 18 of those bad boys.

If anyone in the Long Island, NYC area is interested contact me at bstarcatering@gmail.com

Friday, July 20, 2012

Greek Pizza for Foodie Friends Friday


Go check out Foodie Friends Friday!  The Link Party is where members all link up and share recipes from their blogs :)

Just another version of awesome pizzaness!

Toppers: Chicken, Baby Arugula, Onion, Peppers, Garlic, Tomato slices, Feta Cheese

First get your dough ready:

Dough Recipe

Oven should be the highest it can go- mine goes to 550 degrees F.  Let it preheat, along with your pizza stone if you have one (and if you don't just use a pizza pan or baking sheet)

Ingredients

  • 1 boneless skinless chicken breast, cut into small bite sized pieces
  • 1 large tomato sliced
  • 2 large handfuls of baby arugula
  • 1/2 pepper, diced
  • 1/2 onion, diced
  • 2 garlic cloves, minced
  • a fist sized piece of feta cheese, crumbled
  • salt, pepper and red pepper flakes
Directions
  1. In a skillet saute the chicken breast and season with salt, pepper and red pepper flakes.
  2. When cooked through remove from skillet and reserve.  Then add half an onion, half a pepper (I used green bell pepper) and garlic.  Saute until soft, about 5 minutes.
  3. When the dough is ready roll out and lay on your stone/pan.  Then layer your sliced tomatoes, chicken, pepper onion mixture, arugula and then finally the cheese.
  4. Cook for about 12 minutes and always keep an eye on it- because sometimes it will cook faster or slower depending on crust thickness and oven temps.
  5. When it came out I drizzle with a bit of extra virgin olive oil and let cool a couple minutes then slice and serve!
You can also top with some olives- yum.

:::::::::::::::::::::::::::::::::::::::::::::::::::::

Please check out my fellow Friday Foodie Friends…

Tracy at Busy Vegetarian Mom
Robyn at Robyn’s View
Angie at A lil Country Sugar
Wayne at Passione Per Cucina
Sarah at Everything in the Kitchen Sink
Michelle at From Calculus to Cupcakes
Marlys at This and That
Lois at  Walking on Sunshine
Erika at Chef Picky Kid and Me
Lindsey at Family Food Finds
Cindy at Cindys Recipes and Writings
Skye at A Virtual Essence
Sheri at Homemade Served Here
Keira at Luscious Delights
Amber at Mama’s Blissful Bites
Rhiannon at Baked In The South
Brianne at For the Love of Food (and Eating!)
Pooja at Saffron N Appetite


Last Weeks Top 3 Voted Recipes
1. Marlys at This and That with her Lemon Lime Sugar Cookies

Last Weeks Top 3 with for Most Clicks Are:

1. Spatulas on Parade for the Sock It To Me Cake

Rules:

Step 1:  Make sure that anything you link up is:
  • A Recipe…and is made and photographed by you
  • Not part of a sponsership/sales/giveaway or other promotions/linky parties
  • Linked to a specific page of your recipe, not your homepage
  • Please limit your link-ups to 3 per party
Step 2:
If you want to be the very best Foodie Friend Ever…
  • Grab our button at http://foodiefriendsfriday.com and put it on your page and share Foodie Friends Friday!
  • Take some time and check out other submitted links and the blogs of all of our gracious hosts
  • Come on over and “like” us on Facebook or Follow us on Twitter and Pinterest
***Please note that by linking up you are transferring rights to Foodie Friends Friday and any of it’s affiliated websites or publications to use photos/links/recipes for any reprint, republishing and distribution without monetary compensation to you.  If photos/recipes are used, proper credit/ linkbacks will be published with them.  We just want to share your amazing recipes and spread some foodie <3 !
Have Fun and Thank You for Visiting!!

Wednesday, July 18, 2012

Italian Chicken Foil Packets


I usually have a lot to say about what I make - but not these- these were just AMAZING. Period. Easy and healthy too- you can't go wrong- try them out tonight or at your next camping trip or cook out. You will NOT be sorry.

I know it's not the prettiest picture- but hey- we were roughing it ;)

This made four good sized packets.

Ingredients
  • 3 boneless skinless chicken breasts, cubed
  • 1 red onion, quartered
  • 3-4 plum tomatoes, quartered
  • 2 garlic cloves, minced
  • salt, pepper, red pepper flakes, oregano, basil
  • extra virgin olive oil
  • tinfoil
Directions
  1. You will need to triple layer the tinfoil packets- so each packet with be three layers thick of tinfoil.
  2. So size out three fairly big tinfoil sheets and layer them up.  In the middle of the sheet put 1/4 of the chicken, onion, tomatoes and garlic.
  3. The spices listed were what I used- so about a pinch on each packet.
  4. Drizzle it all with a little olive oil.
  5. Then take the end closest to you and farthest from you and pull up like a tent.  Fold/crimp and roll together the ends to create a seal and continue to roll them down until you reach the chicken.  Then take the ends on the right and left and seal/crimp-  then roll up like the first time. Here's an idea of what they would look like.
  6. Cook for about 30 minutes on a medium grill.  I rotate my packets to the size with more heat then the side with lower heat.  Keep the lid closed too.
  7. When they are done, be careful because they will obviously be hot and steam will escape when opened.  I actually had forgotten how long they were cooking so I just opened one up to check if they were done- if it isn't pink you're good.
  8. Just unwrap the packet and go to town with a fork! I served with large store bought garlic knots.
Oh yea and no fuss clean up- just through away the foil!

Monday, June 18, 2012

Homemade BBQ Sauce


Because homemade is just better. This is easy and way better than any BBQ sauce I ever bought in a bottle.  (Just take a look at the ingredients of that bottled sauce next time. ugh-half I couldn;t even pronounce)  There are so many different ways to create a BBQ sauce from scratch- experiment with different flavors and spices!

Note: this is a bit on the spicy side. To tone down the heat start with just a very small pinch of cayenne (or go with a mild hot sauce and use just a dash) and then progress with more to taste.

Ingredients
(makes about 1 cup of sauce)
  • 1 (8oz) can of tomato sauce
  • 2 tbsp of ketchup
  • 1 tbsp of Dijon mustard (you can use whatever mustard you have in the fridge)
  • 3 tsp of brown sugar
  • 3 tbsp of apple cider vinegar
  • big pinch of cayenne (Or you can use hot sauce)
  • 1/2 tsp of garlic powder
  • 1/2 tsp of onion powder
  • 1/2 tsp of ground cumin
Directions
  1. In a small sauce pot combine all ingredients and stir to combine.  Heat over medium low heat until it comes to a simmer.
  2. Simmer for at least 15 minutes to let the flavors combine and sauce thicken.  You can keep over low heat and just a slight simmer for really as long as you like.  Longer simmering means a thicker consistency.  If the sauce gets too thick for you- just add a bit of water to loosen it up.
  3. Any leftovers just put into some tupperware and store in the fridge.  You can even put in a squeeze bottle and store like that!

Monday, January 30, 2012

Stuffed Cabbage Rolls


Some people cringe at cabbage, but it is so good for you and if you cook it the right way it really is delicious.  I know there are skeptics right now having flash backs to grandma boiling the crap out of cabbage and stinking up the whole house or your mom forcing you to eat it along side your corned beef for St. Paddy's Day.  Anyway, this recipe is nothing like that at all.  I love my cabbage usually crisp and tossed as a salad but this is probably, besides certain style soups and stir fry, the only way I eat cooked cabbage.  You can always change what is stuffed inside too.  First time I ever made this was with ground chicken for a healthier option.  The cauliflower makes a great addition with no carbs.  Honestly, you don't even really taste it as cauliflower but it helps create a nice texture for the stuffing, as well as also being good for you.

I also prepared this the night before and just refrigerated it overnight.  Then next day I just had my fiance pop in the oven and it was ready to eat when I got home from work.

Cabbage is a low calorie food that is packed with nutrition. Did I mention it's also super cheap! One cup of cabbage has only about 15 calories! It might be low cal, but it's high in Vitamins A, B, C and E, along with fiber and iron. This helps with digestion, skin, eyes, metabolism, and your immune system.

Ingredients

  • One large head of cabbage.  I used Savoy this time, but I have also used just regular plain green cabbage.
  • about 2-3 pounds of your choice of ground meat- I used beef
  • 1 small head of cauliflower, chopped small
  • about one loose cup of Parmesan cheese (or two big handfuls)
  • 1 (28oz) can of tomatoes (I used crushed, but use whatever you use for tomato sauce)
  • 1-2 tsp of garlic powder
  • 1-2 tsp of red pepper flakes
  • salt and pepper for the "stuffing" and the sauce

Directions

  1. Preheat the oven to 375 degrees F
  2. Combine the meat, cauliflower, cheese and fresh black pepper in a bowl, set aside.
  3. Get a large pot of water hot- it doesn't have to boil, we are just using it to soften the leaves of the cabbage so they come off easily and we don't rip them.
  4. When the water is hot, cut the core out of the cabbage and put the whole head of cabbage in the pot.  As the leaves soften, either carefully using your hands or gently with tongs, peel the leaves off and set aside to drain and cool before we stuff and roll.
  5. In a casserole dish or large pan (I had to use two pans to hold all my rolls) pour in and combine the tomatoes, garlic powder and red pepper flakes. Salt and pepper to taste.  I also mix it up with a splash of water if it looks too thick.  The sauce is just to help it cook without drying it out.  I reserve a bit to put up on top before I cook.
  6. When the leaves are cool enough to handle we just stuff and roll the filling like a burrito.  I usually like to cut the large vein part out of the leaf so it is easier to roll but that is optional.
  7. Just roll and stuff (as you get down to the center of the cabbage obviously the leaves become smaller so you will use a smaller amount of stuffing.

  8. To roll: Place the meat on the rounded uncut end of the leaf, firmly but gently roll once, tuck in sides and roll again.  Place seam side down in the pan.  Just like a wrap or burrito.

  9. When all your rolls are rolled, top with a bit of reserved tomato sauce and cover with tinfoil.
  10. Bake covered for about 1- 1 1/2 hours.
  11. I served along side some jasmine rice mixed with bulgar wheat.  You could also have stuffed the rice inside- just precook a cup to a cup and a half of rice and swap it with the cauliflower in the stuffing.

Thursday, December 22, 2011

California Chicken Burgers with Cabbage Carrot Slaw


I know I have been slacking! Just realized my last post was the beginning of the month! Tomorrow I hope to post some cookie recipes I will be trying out.  I don't do much baking, so we will see how good they come out.

Here in New York it definitely doesn't feel like winter and if the BBQ wasn't all packed away I just might have broke it out.  So instead I got the trusty George Foreman grill going and made some of these tasty tasty burgers.  Chicken burgers are not the same as beef, because 1) they have no flavor on their own and 2) you MUST cook them all the way through.  Both reasons might make chicken burgers a bit tricky but with all these big flavors and my trusty meat thermometer we are ready to go.  I also have to add that these are pretty healthy- we ground boneless skinless chicken breasts ourselves, flavored with spices and low calorie items and used turkey bacon.  The slaw is good for you too- no mayo and we used heart healthy extra virgin olive oil. (I can only hate on the bread because of the carb count- but what the heck- it's the holidays right?)

A chicken burger is not exactly an original but I couldn't find a recipe that was exactly what I wanted so obviously I just made up my own with all the flavors I liked the best.  This idea came from a wrap that was on the menu at one of our favorite diners, that unfortunately closed down :(  But now will live on in this recipe :)

For 6 burgers:
  • 2 ½ boneless skinless chicken breasts
  • 2 tablespoons of McCormick Montreal Grill Seasoning
  • 2 cloves of garlic, minced
  • ½ red onion, diced
  • 1 ½ carrots, shredded (shred 3 all together if making the slaw too)
  • 2 chipolte in adobo, chopped
  1. In a food processor (or a meat grinder) grind up the chicken.  If you want to buy already ground chicken, I would say this came out to about 2 pounds worth.
  2. Then mix the meat and all the other ingredients in.  Then form the patties (I got about 6, it might vary on the size of your chicken breasts)
  3. Get your grill or frying pan hot and cook until done- about 160 degrees, the carry over heat will cook it to the safe 165 degree mark.  About 6-8 minutes each side if in a frying pan.  The GF grill took about 6-8 mins all together (obviously because it cooks both sides at once)


For the Red Cabbage and Carrot Slaw:
  • ½ of a medium sized head of red cabbage, shredded
  • 1 ½ carrots, shredded
  • the other ½ of that red onion, sliced thin
  • juice of one orange
  • extra virgin olive oil to coat
  • 2-3 tablespoons of apple cider vinegar (or red wine vinegar would be good too)
  • salt and lots of fresh cracked pepper
Mix all ingredients in a bowl, cover and let marinate in the fridge while you make your burgers.

Toppings

Really they are whatever you want- BUT when people classify something as "Californian" for some reason it always has avocado. So this is what I topped mine with:

  • Turkey bacon or regular bacon
  • Avocado, sliced
  • Tomato, sliced
  • Cabbage and carrot slaw
  • Baby spinach
If you needed a dressing of some sort I would go with a honey mustard or blue cheese.  OR instead of mixing the chipolte in with the meat- you could mix it up with some mayo and use that as a dressing.  I skipped the cheese but a spicy monteray jack cheese would be awesome (because it originates from CA!) or maybe a tangy provolone.

Pile it high on a crusty but soft bun and this is one burger you will be making again!

Tuesday, September 6, 2011

Panzanella

Panzanella is a traditional Italian bread and tomato salad.  There are many versions of this salad, but the 2 key ingredients are stale bread and tomatoes.  And when I say stale, I mean hard NOT moldy.

There are so many good things about this recipe:
  1. Super simple to make
  2. No stove required
  3. Using up ingredients you might have just thrown out
  4. Healthy
  5. Delicious
  6. Versatile/customizable
This recipe reminds me of when Brendan and I lived in our 2nd apartment in Bellerose, NY.  Almost every night in the summer I would make grilled chicken and this salad and we would enjoy dinner outside on our back porch.  Perfect for those fresh summer veggies and days that are too hot to cook.

I am also trying to use up all the gorgeous veggies that my dad has grown in the backyard this season.  We need to finish up the summer harvest so he can plant the fall harvest! Absolutely love that he grows all this stuff! Free fresh veggies, I can pickle all the hot peppers, make sauce from tomatoes and can for the winter, andddddd I just found rosemary growing too! Wonderful! I wish I had the time, patience and room to grow plants/food like my dad does.


Ingredients
(This is what I used to make about 4 good-sized bowls of the salad)
  • 1/2 loaf of stale french baguette, broken into pieces
  • 3-4 large really ripe tomatoes, chopped into big chunks
  • 1 cucumber, chopped into big chunks
  • 1 small red onion, sliced thin
  • 15 basil leaves, ripped/torn/sliced
  • EVOO
  • red wine vinegar
  • salt & pepper
Directions
  1. Take half your bread and soak in water.  Reserve the other half for now. (If you don't have juicy tomatoes then soak all your bread in water)*
  2. Cut your tomatoes and put in a large bowl.  Squeeze them in the bowl so a lot of their juices are released.
  3. Cut up the cucumber, onion and basil and add to the tomatoes.
  4. Carefully and gently wring the water out of the bread that's soaking and break up/crumble with your fingers and add to the bowl with the veggies.  Add the dry bread in as well.
  5. I drizzled in about a 1/4 cup of EVOO and about 3-4 tbsp of vinegar.  Salt and pepper to taste.  This step is based on your preferred taste.  Add more or less of any of these ingredients.
  6. Toss to combine and let sit about 10 minutes.
  7. Enjoy with some simple grilled chicken and you have a lovely simple summer time dinner.


*The soaking of the bread in water is the traditional part of the dish.  I've read a lot of recipes for panzanella, some people toast the bread, but I think that takes away from the essential idea of the dish by toasting.  (I would agree though it will change the overall taste of the salad) It's kind of a throw-together & use-up-what-you-have dish (very Italian).  Besides, the bread is already rock hard and why waste time toasting. 

I soaked only half the bread in water and left the rest out, because I wanted the other half to soak up more of the tomato juices.  That's why I squeezed the tomatoes in the bowl in the beginning.  But you can do whatever you want- it's your salad, and you're going to be eating it, not me.

As I said before, this dish is very easy to make according to what you like, so add more of one ingriedent if you want.  Even though this is a good guidleine to go with, I never follow a set recipe for this.  It really is just throw in whatever you have and toss with some stale bread.  You can use peppers, capers, garlic, carrots, parsley, olives, cheese etc.  Recipes like this make leftovers look good, even impressive!

Monday, August 22, 2011

Chicken and Tomato Pizza

This is my favorite pizza.  I mean, I am a lover of all pizza, but this one is always my go-to.  I could literally eat a large pie on my own, yes I know disgusting, but that is seriously how much I love it.  I've made pizza at home countless times and sometimes it comes out simply amazing (like this one), and other times it is just ok.  I guess I haven't mastered the art form (yet), and of course it is difficult when you don't have a pizza oven that can reach temperatures over 700 degress.  I still need to invest in a pizza stone one of these days, but for now my pizza pan will do. 

I have always used the same recipe for pizza dough, which you can check out in my Margherita Pizza Blog Post but this time I tried all bread flour (honestly because I ran out of regular flour) and like 1/2 tsp of baking powder.  I don't think the baking powder actually did anything, but I figured why not try it. (I'm sure everyone that knows how to bake is mocking me right about now)

Pizza Dough Recipe
(This makes about 2 pizzas.  I usually make one big pizza and use the rest for garlic knots- we'll save that for another blog because I'm still trying to perfect that recipe)

  • 3 cups of bread flour
  • 1 tablespoon of sugar
  • 1 tsp of salt
  • ½ tsp of baking powder (optional)
  • 1 packet of dry active yeast
  • 1 cup of warm water (about 100-110 degrees if you want to get technical)
  • 1 tablespoon of extra virgin olive oil
  1. Pour the yeast into the warm water and stir to combine.  Let this sit for about 2-5 minutes to reactivate the yeast.  When the yeast gets all foamy on the top it is ready.
  2. In a big bowl combine the flour, salt and sugar (and optional baking powder) with a whisk and make a small well in the middle of the bowl. 
  3. Then add the oil and yeast water to the well and combine with your hands until a sticky ball of dough is formed.
  4. If you need to add a little more flour, just add a little at a time.
  5. Take out of the bowl and knead the bread for about 5 mins. (Anytime you knead dough you want to sprinkle the counter or work area with flour so the dough doesn't stick) Shape it into a tight ball. Then put back into the bowl and cover entire ball with some oil (I usually just spray it with cooking spray) and cover with plastic wrap where the plastic wrap is touching the dough- not tightly covering the bowl on top, we are just covering the dough from the air so it doesn't form a tough "skin".  You could even drape a kitchen towel over the top of the bowl instead.
  6. Let sit for at least 45 mins in a warm place until it has doubled in size.  If you don't have a warm place, turn the oven on to 200 degrees for a couple mins then place the bowl with the dough in there (but obviously shut the oven off- we aren't cooking the dough yet)
  7. When it has doubled in size, knead it again for about 5 mins and then divide the dough into two even pieces.  Roll out the dough into the shape of your pan (pizza pans are cheap- I have two: one from Waldbaums, and one from Wal-Mart, but before I had the round pans I just made my pizzas "Sicilian" or rectangle and put on a baking sheet.) Transfer to your pan and top with toppings.
  8. Cook for at least 10 mins at 450-500 degrees.  Pizza cook time will vary on crust size and what you topped the pizza with.
Now onto the toppings...

  • 1 boneless skinless chicken breast, diced into small pieces
  • 2 tomatoes, diced (or one (14oz) can of diced tomatoes drained)
  • about 10 basil leaves, chiffonade (Which means cut into thin long strips.  All you do is pile up the basil leaves, roll them into a little log and cut across, the result will be nice ribbons of basil) but you can also just rip or chop.
  • about 8oz of mozzarella cheese (but I probably wind up using more)
  • 1/4 cup of you favorite sauce
  • oil, salt, pepper, red pepper flakes
  1. Dice the chicken.  In a small frying pan add about a tsp of oil to the pan and heat over medium heat.  When hot add the chicken and a pinch of salt, pepper and red pepper flakes.
  2. Cook only about 5 minutes until the chicken is no longer pink.  Turn off the heat and set aside to cool.
  3. Dice the tomatoes and seed/squeeze them out a little.  You don't want your pizza to be watery.
  4. When you have your dough ready and on the pan, coat the dough with sauce.  Use very very little sauce.  Too much sauce is a common mistake and will result in a wet, uncooked bottom of the pizza. Gross. 
  5. Top will cheese, cooked chicken, tomatoes, and basil
  6. Cook until done.

Monday, July 25, 2011

Spicy Grilled Shrimp w/ Couscous

So this isn't just any grilled shrimp and couscous- its spicy garlic shrimp with feta, tomato, and red onion couscous all topped off with a kiss of olive oil and lemon juice.  Believe me this is a recipe you are going to want in your back pocket, especially on those REALLY hot days where even using the microwave makes you feel hot.  I'm sure everyone knows that this past week has been murder with temps reaching well over 100 degrees (well, in NY anyway where we aren't used to it being that hot). I love to break out my trusty George Foreman grill for things like this, but the shrimp can be cooked just as easily and quickly in a saute pan.

I actually went out and bought uncleaned shrimp, and yes you could say it was "rewarding" to stand there and clean about a pound of shrimp, but for the extra dollar a pound I should have bought the cleaned ones.  I would recommend buying the uncooked (or raw, grey colored), cleaned and deveined shrimp versus the pre-cooked ones (the pink ones) because I personally feel it is fresher and the shrimp wont be overcooked.  I left the tails on just for show really, but you can just pull them off if you want before cooking.

Oh and if you are curious, when you say "deveined" shrimp, it just means that the shrimp has had its digestive track removed (yea I know it's a little gross).  It's one little "vein" looking thing that runs along the inside of the shrimp and it's really no good to eat- so they remove it.  If you decide to clean your own shrimp make sure you remove the outer shell and the digestive track.

Another tip on shrimp: They come in a variety of sizes, I actually forgot what size I purchased specifically for this dish, but it was the one on sale.  The numbers usually found under the name of the shrimp signifiy the "count" or about how many shrimp there are per pound.  Obviously, there will be a higher count per pound of smaller shrimp, and fewer (like extra large or colossal) shrimp per pound once they get larger in size.  The count is a range that can look like 31-45 or 31/45. 

Ingredients
  • about one pound of raw, cleaned and deveined shrimp
  • 3 garlic cloves, minced or grated
  • 1 tsp of red pepper flakes, 1 tsp of salt, fresh black pepper
  • 2 tomatoes, diced
  • ½ red onion, diced (or you could use the whole onion- too much raw onion gives me agita)
  • about ½ c. of feta cheese, add more if you like
  • handful of chopped fresh parsley
  • 1 lemon
  • extra virgin olive oil
  • 1 cup of couscous (or your favorite box of couscous)
Directions
  • Preheat your George Foreman grill, grill pan, or your saute pan.  If I was sauteing the shrimp in a pan I would use about a tablespoon of butter as well as oil.  Don't blast the heat with the oil in the pan until you are ready for the shrimp because the oil might start to smoke and the butter might burn before you are ready.  If the oil does smoke just remove from the heat.
  • In a bowl, take the shrimp, garlic, red pepper flakes, salt and pepper.  Cover with about 2-3 tablespoons of oil just to coat everything.  Mix well and set aside. 
  • While we let that hang out for a few minutes, chop your tomatoes, onion and parsley.  Then put into a large boil.  Crumble in your feta cheese as well. 
  • Follow the instructions on the box of couscous.  Usually you bowl water and salt, then when it comes to a boil you put the couscous in, stir, then cover and let sit for about 5 mins.  When the couscous is done it is important to fluff it before adding to the bowl with the tomatoes and onions.  Combine couscous and other ingredients in the bowl well.  Add about 2-3 tablespoons of extra virgin olive oil and taste to see if more salt and pepper is needed- it probably will need some. Set aside.
  • When your cooking vessel is hot- add the shrimp.  It should only take about 1-2 minutes on each side.  Cooking shrimp is probably one of the easiest foods to know when it's done- it goes from grey to pink/orange color.  Try not to overcook them though- otherwise they will taste rubbery.
  • Family style and individual plating is basically the same.  Take your couscous and cover the bottom of the plate and then place the shrimp on top of that.  Squeeze the juice of the lemon on top and serve with an extra sprinkle of parsley if you want.

Thursday, July 21, 2011

Roasted Chicken w Garlic, Onions, Tomato & Bleu Cheese

This was a "left-over" dish.  I needed to use up a bunch of things and this is what I came up with.  Serve it all on top of your homemade focaccia bread and omg yes delicious.  Salty, juicy, and that roasted flavor of the garlic- o man! My mouth is watering right now.  When you roast garlic whole- it is something completely different than raw garlic or even cooked.  It gets this subtle nutty and sweet flavor.  Roast a whole head of garlic and use what you need now and save the rest for later.  It can be used in sauces, salad dressings, or even just smeared on things almost like butter. Another thing that makes this dish awesome is that it is super easy- everything just gets popped into the oven- all you need to do is cut the veggies!


Ingredients
  • 4 boneless skinless chicken breasts
  • 2 onions sliced
  • 1 pepper, sliced (I used mini peppers and I just halved them)
  • 1 whole head of garlic (take 2 cloves and mince them)
  • 3 tomatoes sliced
  • few ounces of blue cheese
  • I used McCormick's Montreal Steak Seasoning (but if you don’t have, just use salt, pepper & a little crushed red pepper flake)
  • 1 tsp dried oregano
  • salt and pepper
  • EVOO
  1. Preheat the oven to 450 degrees
  2. Place the chicken in a baking dish or sheet pan- drizzle with oil and the Montreal seasoning and oregano.
  3. On a baking sheet put the onions, pepper, and two minced garlic cloves and drizzle with oil and salt and pepper
  4. Take the remaining head of garlic, slice the top off (not the root end) and wrap in a small piece of tinfoil. Before you seal it up drizzle with just a little bit of oil.
  5. Put the chicken, veggies and garlic pouch in the oven.
  6. Cook for about 15 minutes, then flip the chicken and toss the veggies around.
  7. Cook for about another 10 minutes or until the chicken is cooked through to 165 degrees. I like to put the chicken under the broiler for a minute or two to get it browned on the outside
  8. Slice the chicken.  Take your leftover focaccia bread and top with the onions and peppers. Top it all off with the fresh tomatoes and blue cheese.  Drizzle with a bit of oil and dig in! Oh and don’t forget to serve a bunch of roasted garlic along side!


Friday, June 24, 2011

Bleu Cheese, Bacon and Tomato Crostata

This recipe was inspired (and requested by) my friend Adam Lombardi who is working on DA Brown's reelection campaign.  So this recipe is nicknamed the Campaign Crostata.  Something to help keep you going after long hours of hard work and dedication.  A Red,White, and "Blue" dish for politicians and non-politicians alike.  Crostatas are usually shaped into a circle, but I thought it would be fun and symbolic to shape it into a star.  Even if you have no political agenda, you can enjoy this salty crusty dish anytime! And the Fourth of July is coming up- perfect for entertaining on such a joyous occasion. This recipe might look a little intimidating and long but it really is easy.  And the best part is that if you know how to make the crust you can put ANYTHING in this crostata- even make a sweet dessert variation. So try your own version! And let freedom reign ;)

Ingredients

Dough
· 1 c flour
· ½ c cornmeal
· ½ tsp salt
· 3 tbsp COLD butter- cut into small pieces
· 1 ½ tbsp lemon juice
· ½ c cream cheese
· 3 1/2 tbsp cold water


Filling
· 8 slices of bacon
· 1 cup of bleu cheese
· 1 onion
· 1 garlic cloves
· 3 small sprigs of fresh thyme
· Salt, pepper
· 1 tbsp balsamic vinegar

Topping
· 2-3 small tomatoes, sliced
· 1 egg- beaten for egg wash


1.  Preheat oven to 400 degrees. Place bacon on a baking sheet/rack and throw in the oven until brown and crispy- Time will vary; just keep an eye on it.

2.  Slice your tomatoes and put into a strainer/colander and cover with kosher salt.  This will help draw out a lot of moisture so the tomatoes won’t make the crust soggy. When you are ready to use just rinse quickly and shake dry as much as you can.

3.  In a food processor* combine the flour, cornmeal and ½ tsp salt. Pulse to combine. Add the butter and pulse until the mixture looks like a coarse meal. In another small bowl combine the lemon juice and cream cheese and then add to the food processor- pulse a few times. Add the water and pulse until the mixture is moist – but doesn’t form a ball- you still want it crumbly. Take out the dough and place on a sheet of plastic wrap, shape into a dish, cover it up with the plastic wrap and pop in the fridge for about 20 mins.

*If you don't have a food processor, you can always whisk the dry ingredients, then work the butter in quickly with your fingers-work it into the flour by rubbing it in- make sure the butter is super cold- it will start to look like parm cheese, work the cream cheese mixture in with a whisk, same with the water step. Basically if you don't do it with a food processor it's not the end of the world- this isn't exactly formal baking
4.While you wait for the dough- in a small sauce pan get some oil hot and then add the chopped onion and garlic. Heat should be medium, medium low- try not and burn it. Add salt, pepper & thyme.  When that is all cooked turn off the heat, add the balsamic vinegar, and set aside to cool for now.

5.  When the bacon is done, crumble it and add to saucepan with the onion mixture.  Keep the oven on.

6.  Get your dough out and roll into a thin sheet on top of some parchment paper (believe me you're going to want to use this parchment paper, it makes moving it SO much easier)- I made my dough too thick the first time and I wound up having to cook the crostata for a really long time- so roll it thin. I formed mine into a star shape but the easiest way is a circle, so if you don't want to get fancy you can just roll into a circle- the ends are going to be cracking and not perfect, leave them that way it adds to the rustic look of the dish.

7.   Add the cheese to the onion mixture and stir to combine. Then top the dough with it.  Leaving about an inch around the edges so we can fold over the edges and complete the crostata.  Before you fold the edges over, top the filling with the tomato slices. Fold edges over and move the crostata (with the parchment paper) to a baking sheet.  Take the beaten egg and brush all over the dough (this is called an egg-wash).  Then bake until the crust is golden brown and delicious (about 20-25 mins).


Friday, May 27, 2011

A Lite Lunch- The Salad Wrap-Up

I've had a request for vegetarian dishes. They don't have to be boring or stereotypical- vegetables are super yummy and super good for you.  This is a wrap I LOVE to make for lunch, it's light and refreshing, but still fills you up.  Simple, clean flavors all wrapped up and ready to go anywhere! And so many things can be switched around or omitted to your liking!

The Salad Wrap-Up

Ingredients
  • 1 wrap of your choosing (I like the whole wheat or spinach) about 8 in diameter
  • 1 to 2 slices of swiss cheese or provolone (any tangy cheese will do)
  • 1 leaf/piece of romaine lettuce (or any leafy green you like)
  • 1 tomato
  • 1 cucumber (I prefer the seedless english cucumbers so I can leave the skin on)
  • 1 carrot
  • 1 avocado
  • Red wine vinegar
  • Salt

Directions
  1. We need to prep the veggies first, except the avocado and lettuce (you can cut up the whole veggie and save some for the next wrap or just cut what you need).  You can cut up these veggies anyway you like, butttttt the way I like it best is if you cut them all into small matchstick pieces- it lays in the wrap better and you get a taste of everything in each bite.
  2. Cut the avocado in half lengthwise- pop the pit out*- scoop out the flesh with the spoon and cut into about 4 to 5 strips lengthwise.
  3. Now time to assemble! Lay down the wrap, lay down the piece of lettuce, pile on the veggies (you don't need to use everything you cut, just enough to fill up the wrap), and then the avocado.  Sprinkle with some kosher salt and drizzle a bit of red wine vinegar**, roll it up, cut on the bias (cut in half diagonally) and enjoy!

*Avocado pits can be tricky to pop out- cut in half length wise and then hold the half that has the pit in it with a towel in your hand face up towards you.  Take a big sharp chef knife and chop down on the pit (not too forceful- you're just trying to get the knife and the pit to be stuck together a bit). Then just rotate your knife and avocado in separate directions and it comes out very easy.  To get the pit off your knife just push it off from the top of the knife (not sharp end).

**I love the simple taste of just vinegar in this recipe, you definitely should try it, but if you think it's not for you- you can always substitute lite /fat-free Italian dressing (or really any other salad dressing you like)

Monday, May 23, 2011

Homemade Tomato Sauce, Part One

I make my own sauce at home.  My wonderful boyfriend bought me a canning set for Christmas one year so now I make a huge batch then store them in my closet.  It is cheaper to make your own sauce, and I feel, way better for you.  Sauce is only a couple ingredients, it's really not rocket science- I never make the same sauce twice because I always just eye-ball the ingredients.  No fear- it always comes out awesome!  This recipe will be for one meal- but if you want to make a bunch just double, triple etc the recipe.  If you do make more than what you will be eating right away I would recommend you use it within a week or so of making.  If you don't have a canning set, what I used to do was make a whole bunch and put them in Tupperware (each one being for a meal) and let them cool completely, then just stack and pop in your freezer.  Take out that morning before work and it'll be good by dinner time :) Happy Sauce Making!!!

Side Note: In my recipe I use canned crushed tomatoes.  Some people will swear by the whole peeled tomatoes and you need to break them down with your hands or with the spoon but I'm just too lazy and I like the uniformed consistency of the crushed.  Why not use the can labeled tomato sauce? I feel it is too thin, the crushed gives the sauce a little "body".  But any type of canned tomato you like may be substituted in this recipe.

Also-you might hear a lot that you should use San Marzano canned tomatoes.  They are more expensive and chefs claim they make the best sauce.  You can get them right at Waldbaums, but whatever, you wanna get fancy get them- I just use the regular crushed tomatoes when it goes on sale.  As described by Wikipedia: Compared to the regular Roma tomatoes with which most people are familiar, Marzano tomatoes are thinner and pointier in shape. The flesh is much thicker with fewer seeds, and the taste is much stronger, more sweet and less acidic. They originated near the area of Naples, Italy.
http://en.wikipedia.org/wiki/San_Marzano_tomato

Ingredients:
  • 1 (28oz) can of crushed tomatoes (try and get the no salt added one)
  • 1 onion, chopped (I use the regular white ones)
  • 3 cloves of garlic, minced
  • 1 tablespoon each of dried basil* and oregano
  • 1 tsp of crushed red pepper flakes (you can go more if you like it spicier)
  • 2 tablespoons of salt (Kosher of course)
  • About 10 grinds of fresh black pepper
  • Olive oil- I use Extra Virgin
  • Dry white wine
  • About a 1/2 to one cup of water
*(If you have fresh basil- which the taste is always better with fresh herbs- but use about 10-15 leaves and throw them in at the very end- pretty much right before you serve the sauce)

Directions:
  1. In a sauce pan (or skillet) lightly coat the bottom of the pan completely with oil (I know it might sound like a lot but it is an ingredient in the sauce that makes it taste good-that is why I recommend using Extra Virgin)
  2. Heat the oil to about medium-medium high and then throw in the onions and garlic along with a pinch of salt and a couple grinds of pepper.  Do not let the garlic brown- it tastes bitter when it goes too far-if it seems like its getting brown too fast- turn the heat down.  Let the onions become translucent, then deglaze the pan with about a 1/2 cup of dry white wine.
So if you were just thinking OOOOOOOOOOOOhhhhhh DEGLAZING WTF IS THAT!? Lol-its just a fancy way of saying your using a liquid to scrape up all the stuff that is stuck to the bottom of your pan. And honestly you can use red wine too- or just skip the step all together if you dont have any wine.

3.  Let the wine cook out for a min or so then pour in your tomatoes and stir to combine.  Usually my sauce is a bit thick at this point-this is why I add a little water until I like the consistency BUT this step is completely optional- if your using a thinner canned tomato or like really thick sauce don't add water, it's really all personal preference. You definitely don't want this sauce to be too thin (that's sauce making part 2 recipe).

4.  This is when you add all your spices and stir to combine. Bring to a boil and then reduce to a simmer. I've eaten the sauce right away, but if you have the time, the longer it simmers, the better it is.  If you do simmer for a while and it seems that the sauce is reducing too much- just add a little water to get it back.  I would recommend using a cover when simmering the sauce- it splatters all over the place in my kitchen.  You just have to stir occasionally.

BUT if you're hungry right now- as soon as the sauce comes to a boil, reduce to a simmer and then throw your pasta in (a separate pot of boiling water obviously) and cook the pasta to al dente (aka about a min before it's done-see my how to make perfect pasta for more on this)  then toss with the hot sauce- by the time the pasta gets to your table (or your mouth) it'll be fully cooked!

Wanna eat now?! Make this sauce with Perfect Pasta tonight!
Related Posts Plugin for WordPress, Blogger...